Painted Linoleum Bathroom Floor

Hi! I decided it was time to turn my attention to our tiny, neglected downstairs bathroom. The invisible yet defining feature is a trap door under the floor in there that goes to the (terrifying) crawl space under the house. The reason the floor is an unattached piece of linoleum is that we have to fold it back to get to the trap door. I am sure there is a better/more attractive solution to the problem, but we are still in the work-with-what-we’ve-got phase here. The painfully visible feature is the hulking black toilet of doom. Alas, it stays for now…I am basically just pretending it doesn’t exist. This is where we started.

DSC_0629

I think my favorite thing about it is that the previous owners painted it Benjamin Moore’s Quiet Moments, which is possibly the most hilarious bathroom color name ever. Except maybe BM’s Stolen Moments. Luckily, it is a totally inoffensive light greenish, grayish blue. I would love to put some really fabulous wallpaper in there, like Brazilliance, Clarence House’s Congo or Osborne & Little’s Summer Palace. However, those are all serious investments and we plan to redo the kitchen at some point which might mean moving the bathroom wall, so Quiet Moments it is for now. The first thing to go in there was my Animal Print Shop Giraffe, which I love so much. The sink is beyond small and there is hardly room for a bar of soap, so I added a simple glass shelf (this one from Home Depot), as well as the round mirror and a rug.

DSC_0597

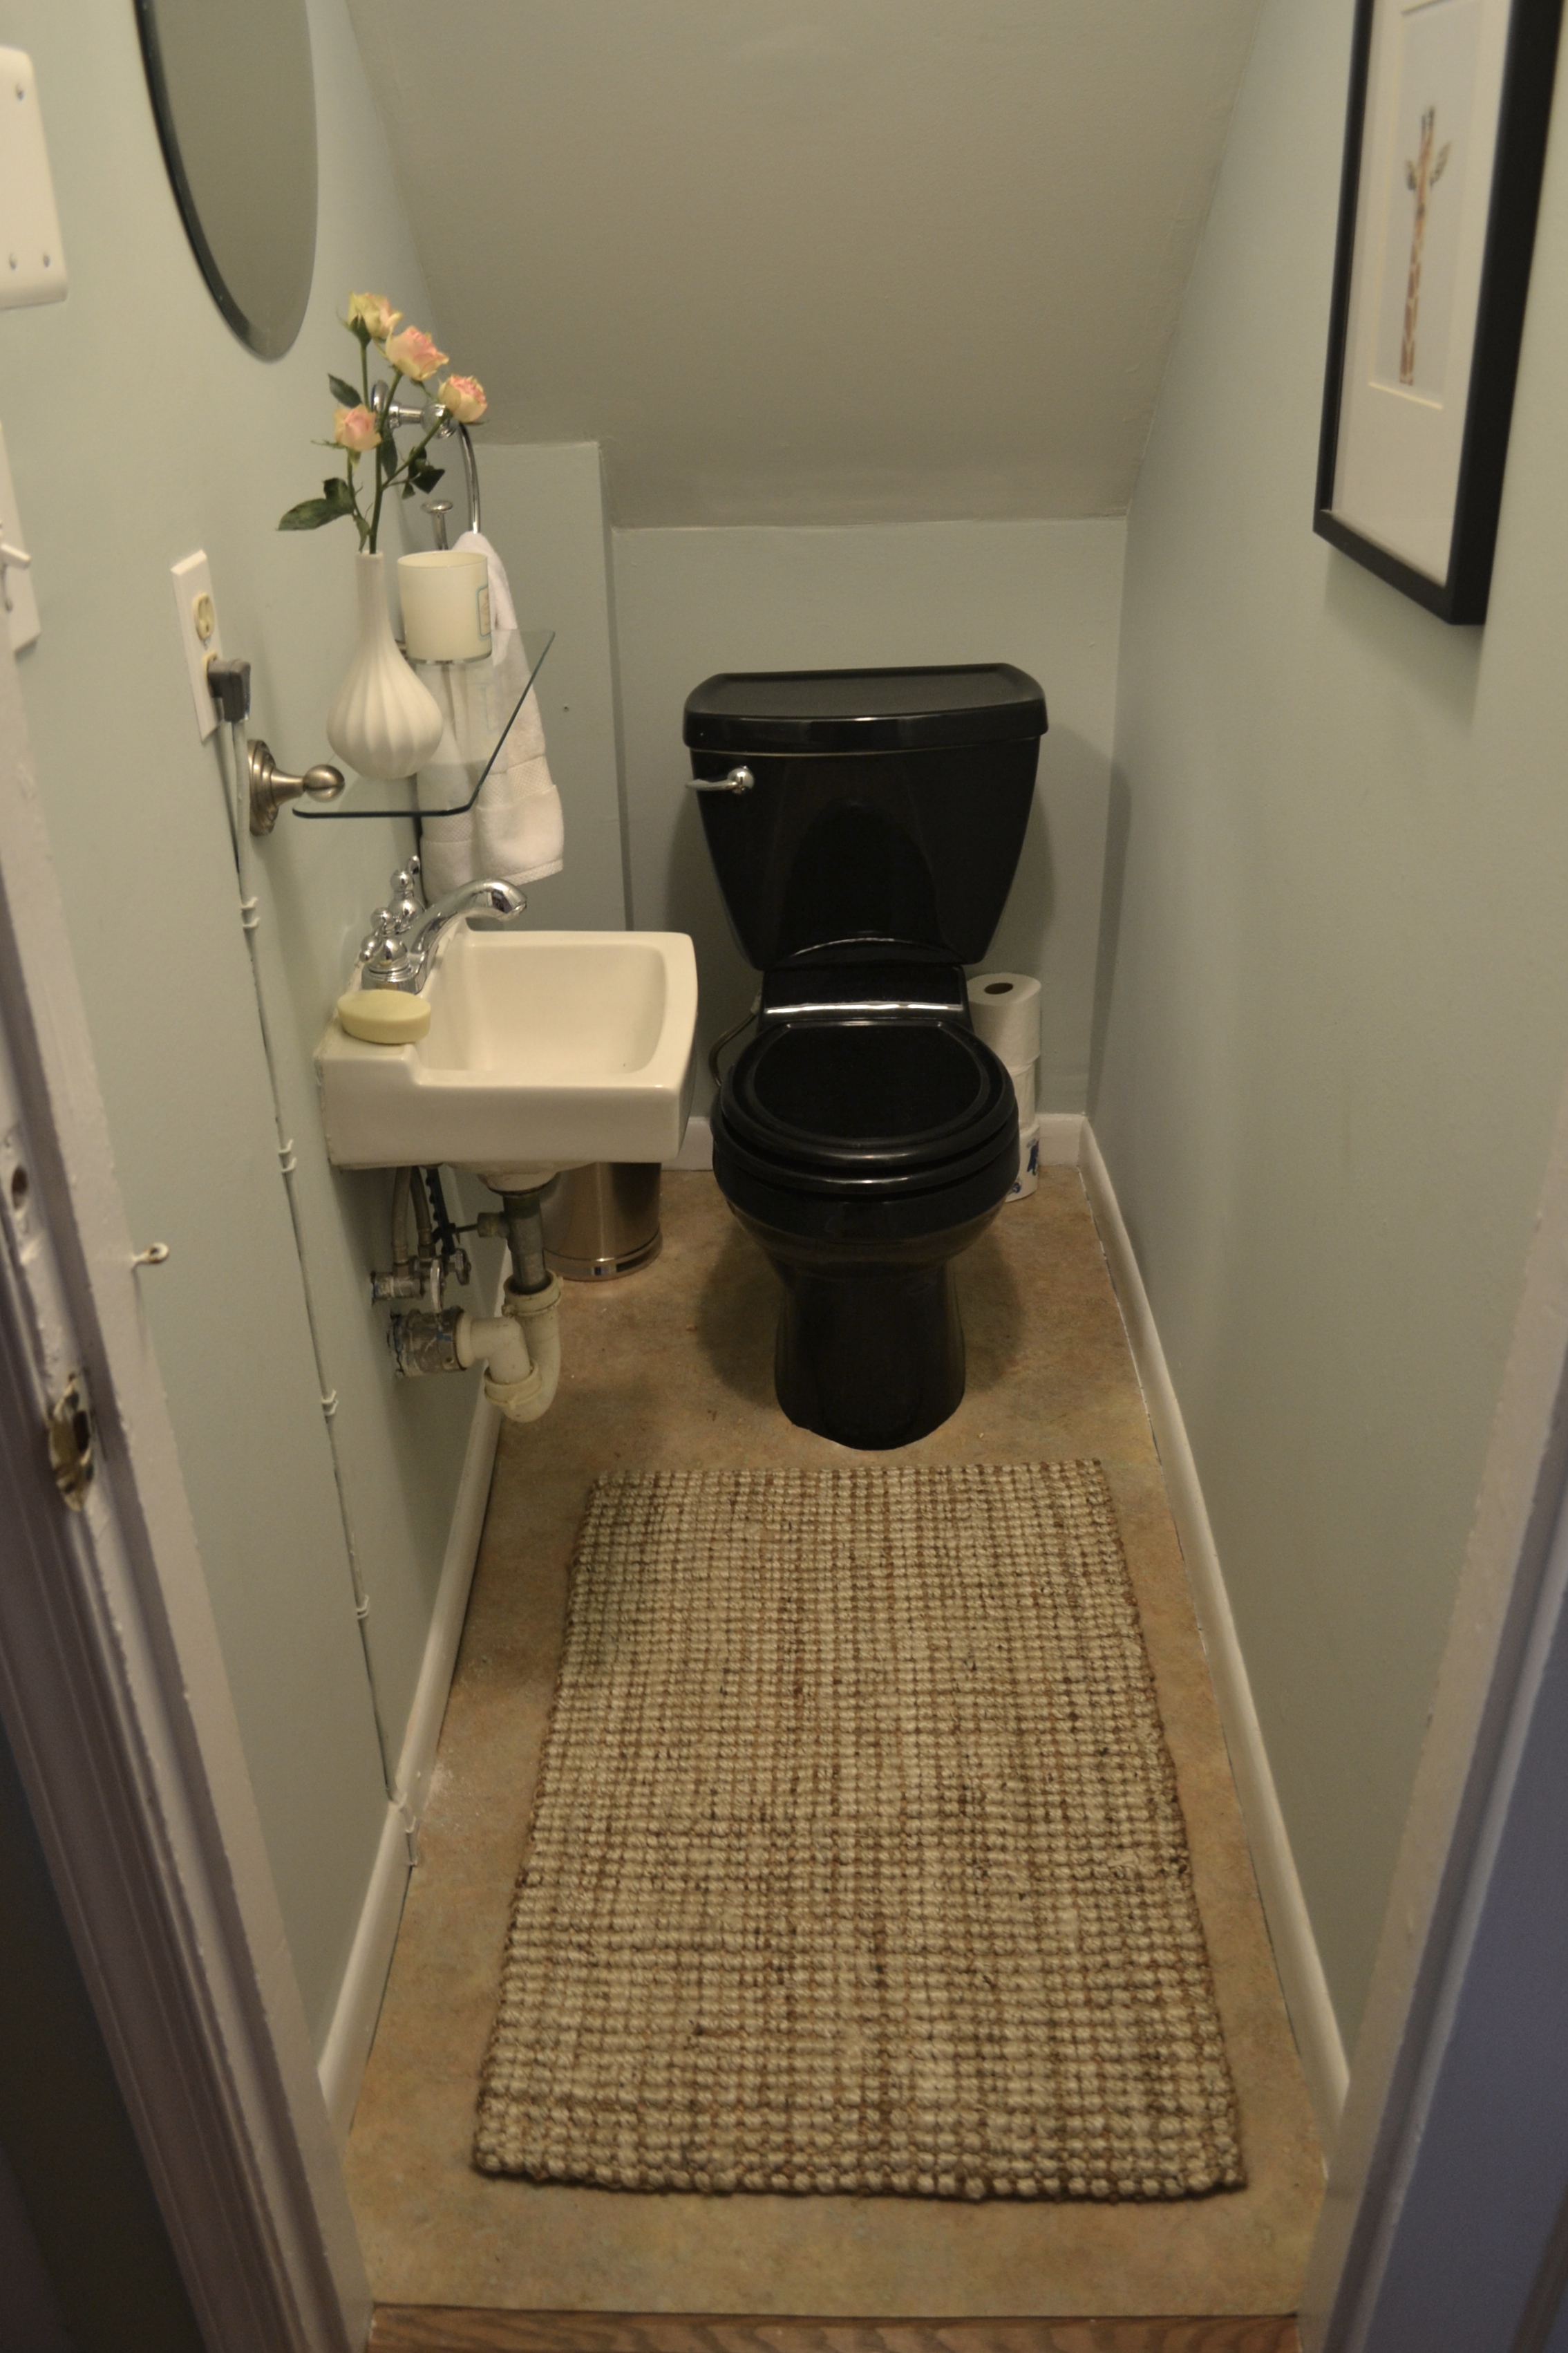
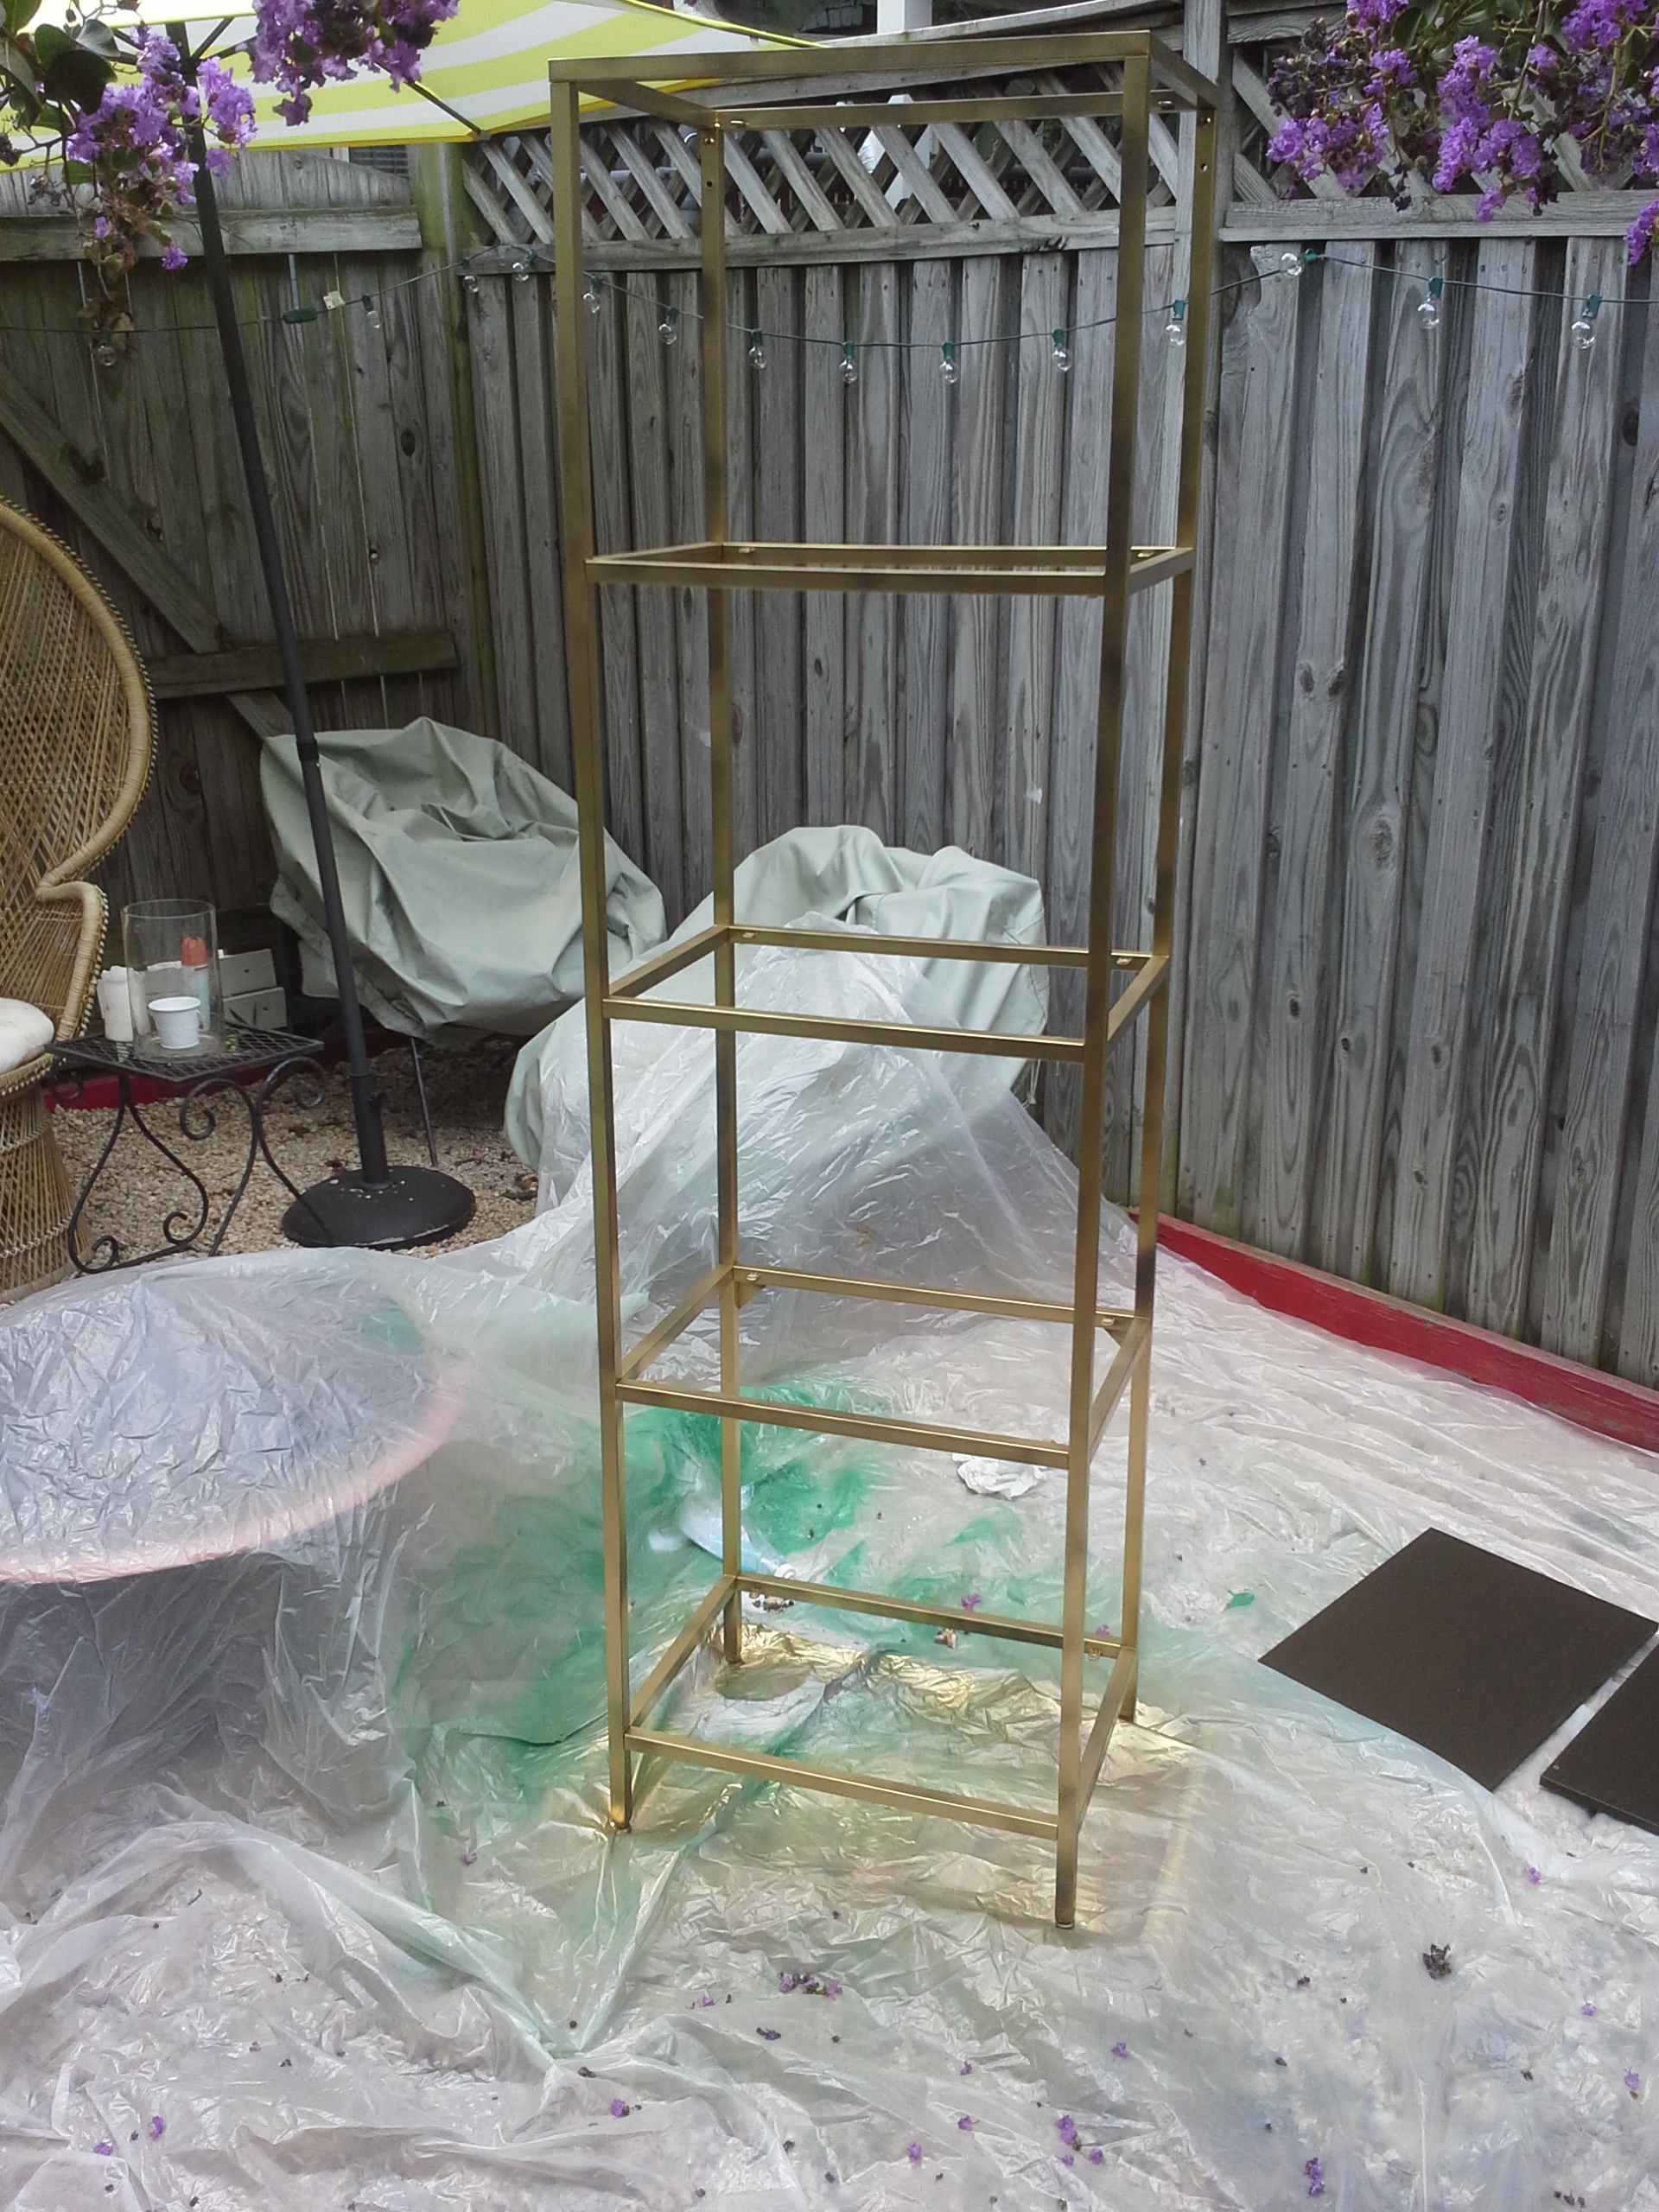
The latest round of updates started with the sisal mirror and a few other small projects, including painting the linoleum white. I also spray painted the pipes under the sink and while not as good as actually being all nickel pipe, it’s way better. I was just not feeling the white floor though. That’s where this post’s project comes in.

Diamond Painted Linoleum Floor

Materials:

  • Graph paper and a pencil
  • Paint – I used white, BM Quiet Moments, BM Mellow Yellow and Rustoleum Bright Coat Metallic Finish in Silver
  • Painter’s tape
  • Ruler
  • Math Skillz – or time and patience. I am not blessed with the first or last, but I muddled through
  • 1″ artists brush
  • 2.5″ angled paintbrush

The one good thing about the weird linoleum/trap-door situation is that I could pull the whole thing out and lay it out on the beer die table table extender in the backyard, which opened up a world of options. I decided to paint a pattern on the floor. I originally thought a scalloped pattern of some kind, but I wanted to start that afternoon and so a pattern using painters tape would be easiest. I looked around for inspiration and remembered Mandi’s wall pattern on Vintage Revivals from a few days earlier. I adapted it slightly and sketched it out on graph paper.

DSC_1008

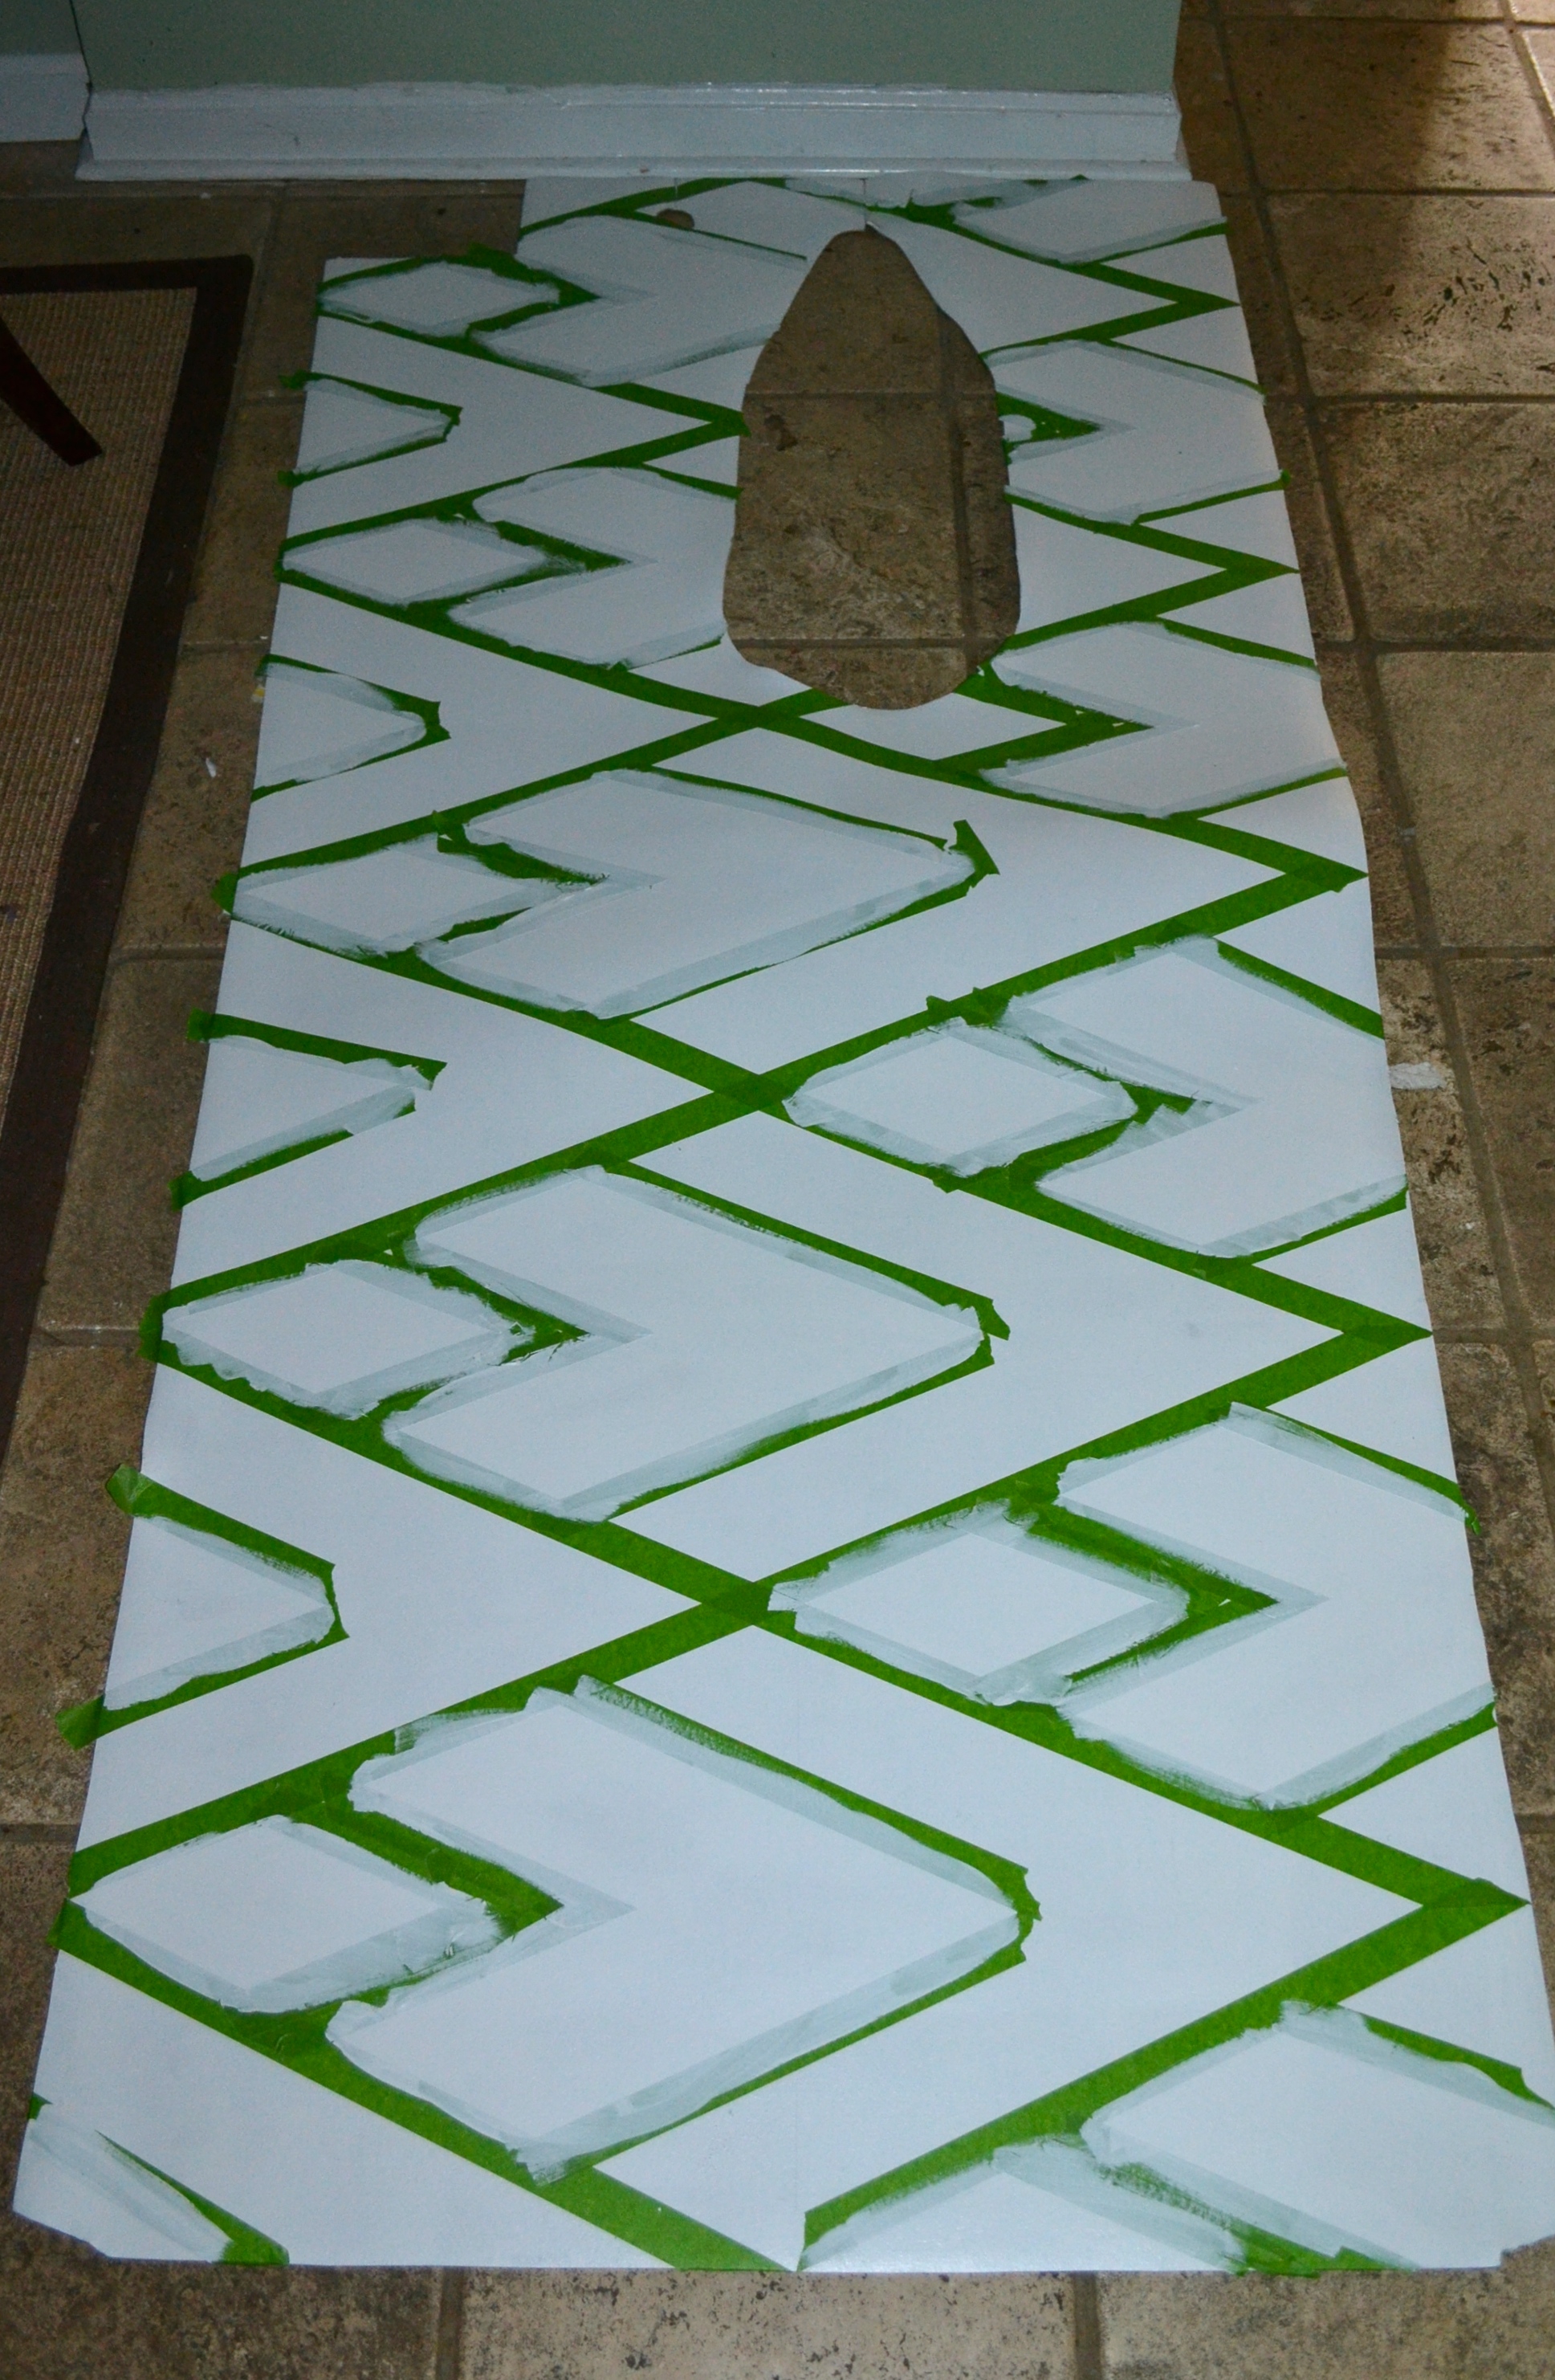
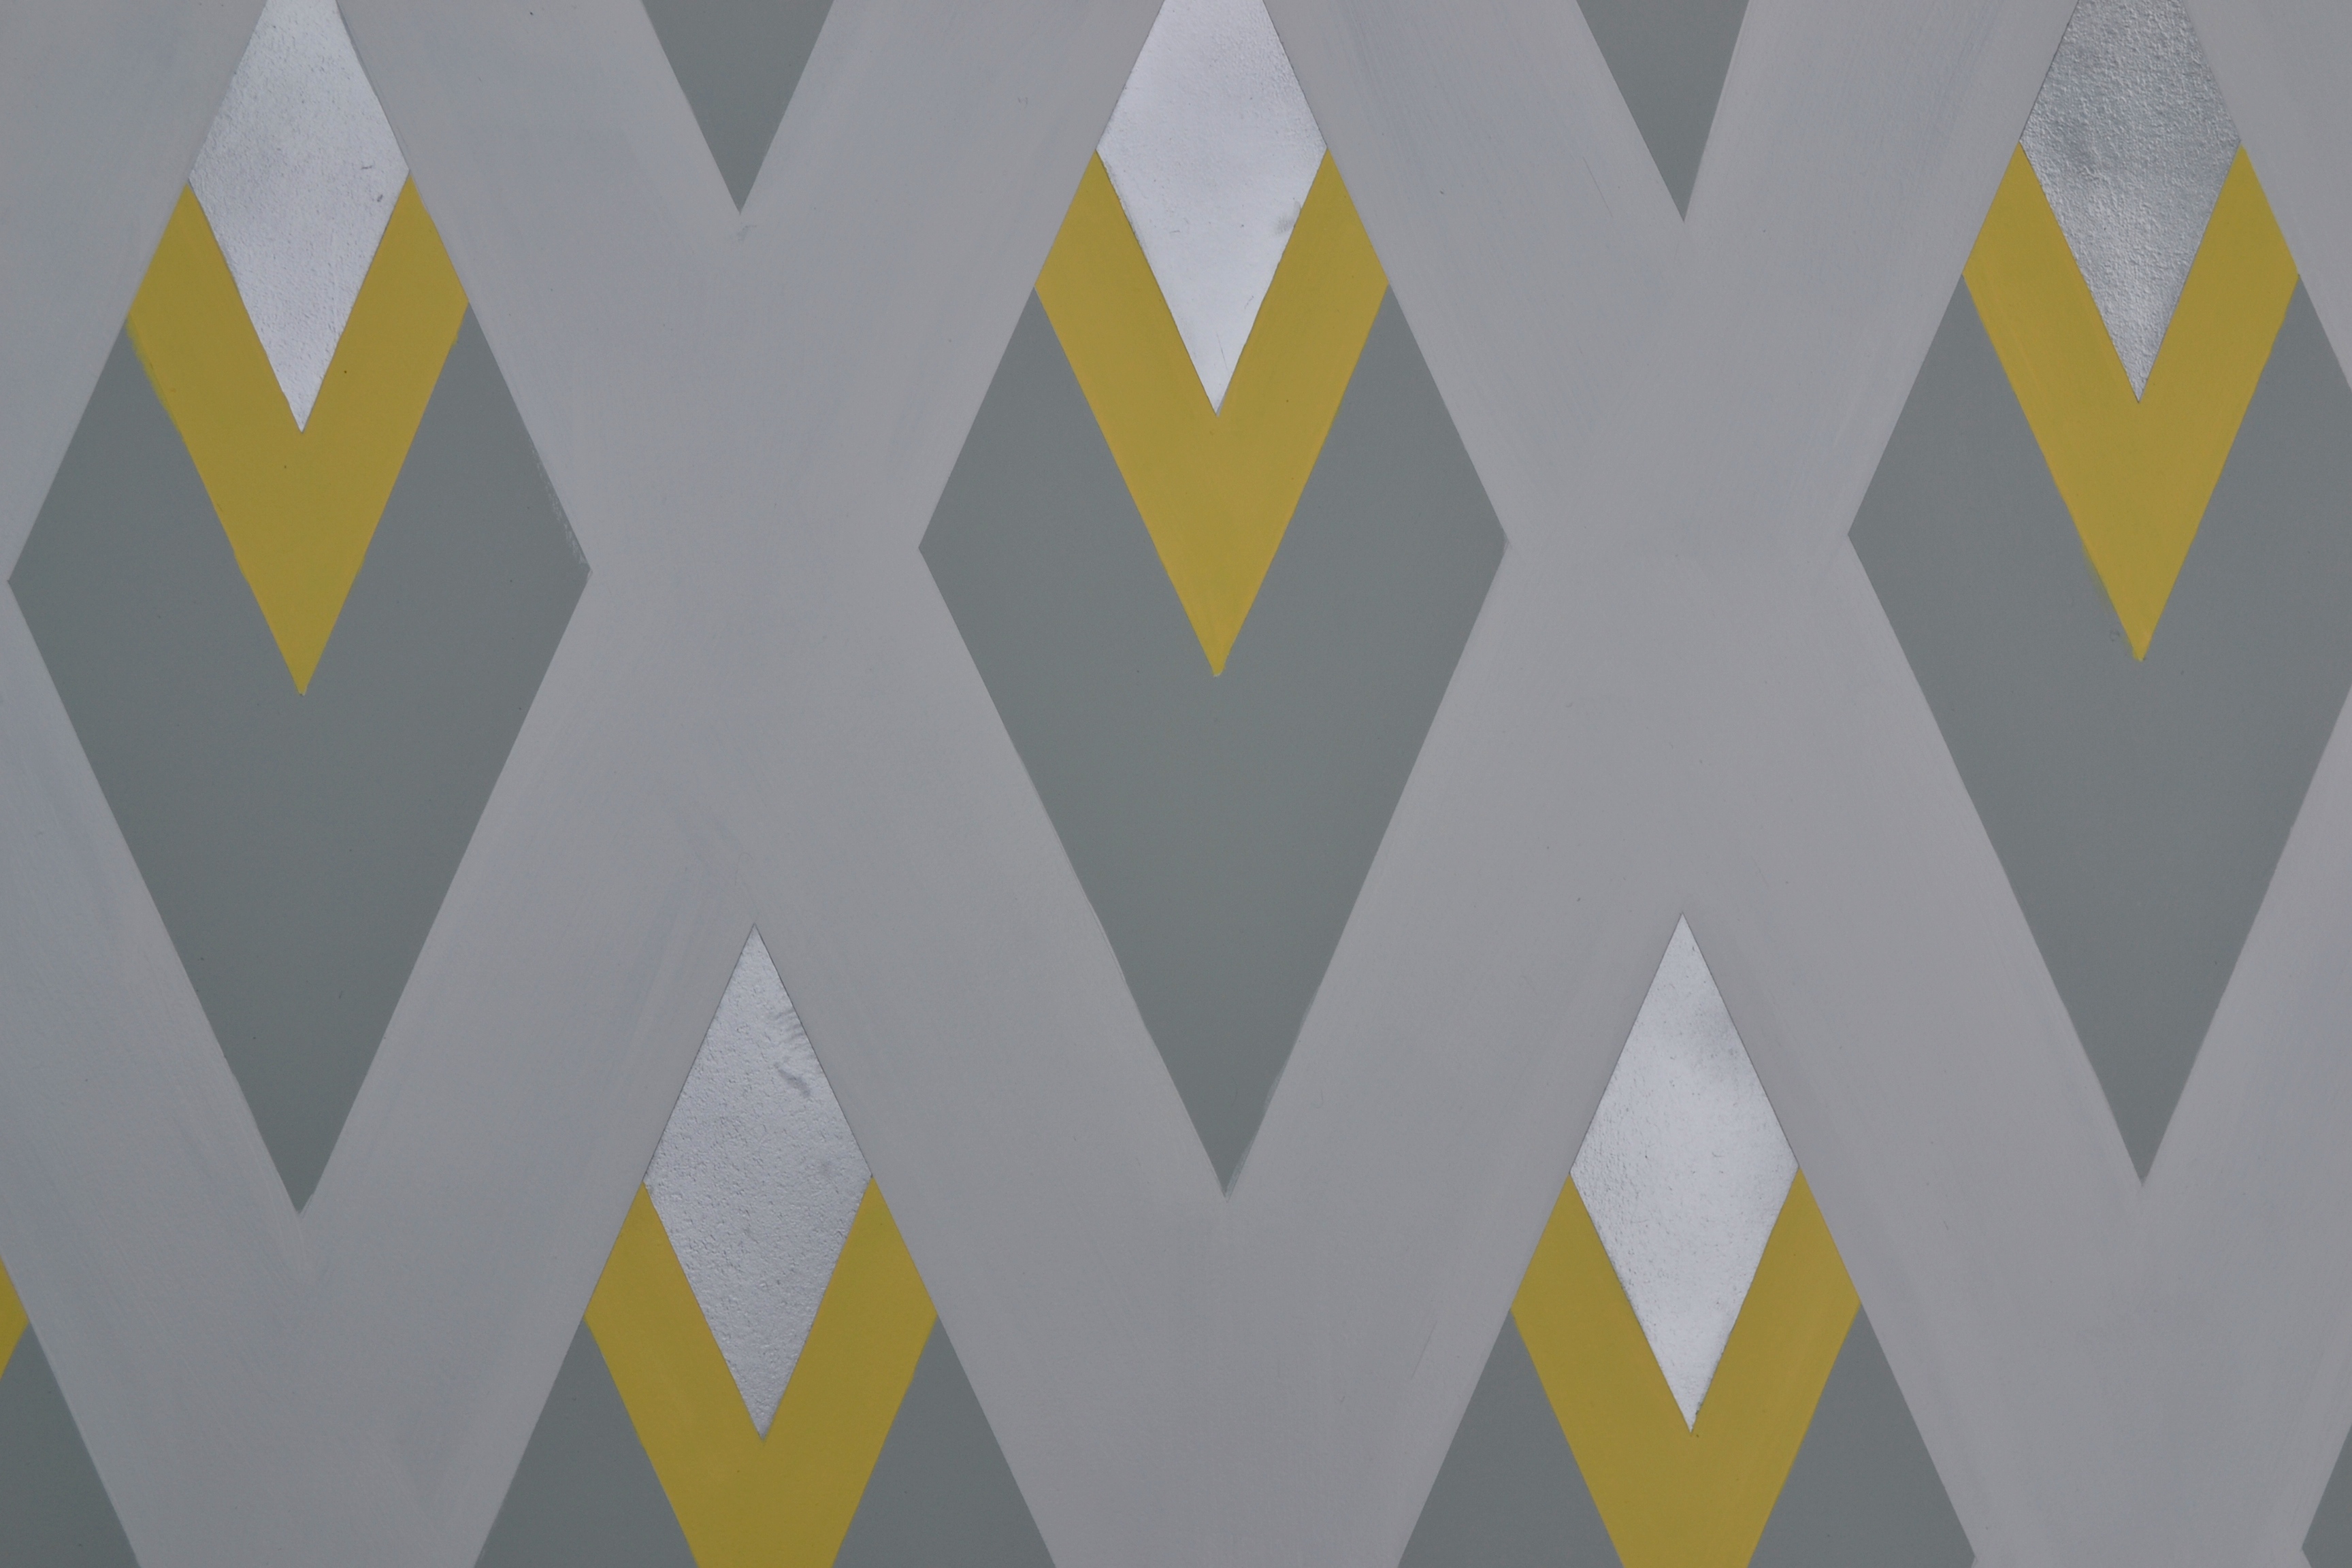
Once I knew what I wanted, I figured out how to translate the pattern on the graph paper to tape on the linoleum. It. Was. Hard. And not made easier by the clouds of pot smoke wafting across our back yard thanks to our neighbors. I started by making large diamonds and then dividing them into smaller ones, using Mandi’s pattern as a reference. The important part is remembering to measure the distances from the correct side of the piece of tape. The diamond points on the sides needed to be 14″ apart, so I had to remember to include the 1″ piece of tape in the measurement. Here it is mid-taping for reference. The small diamonds will be silver, the two-piece think lines are where the yellow will go, and the diamond after that will be blue. The rest will be white.

DSC_0944Once all of the taping was done, I painted white over the edge of the tape in the spaces I was going to paint blue or silver with the idea that any paint that seeps will be white onto white, not the color onto white. It’s a little easier to tell what is going on once that step is complete. It started raining so I had to do the next bits inside.

DSC_0945
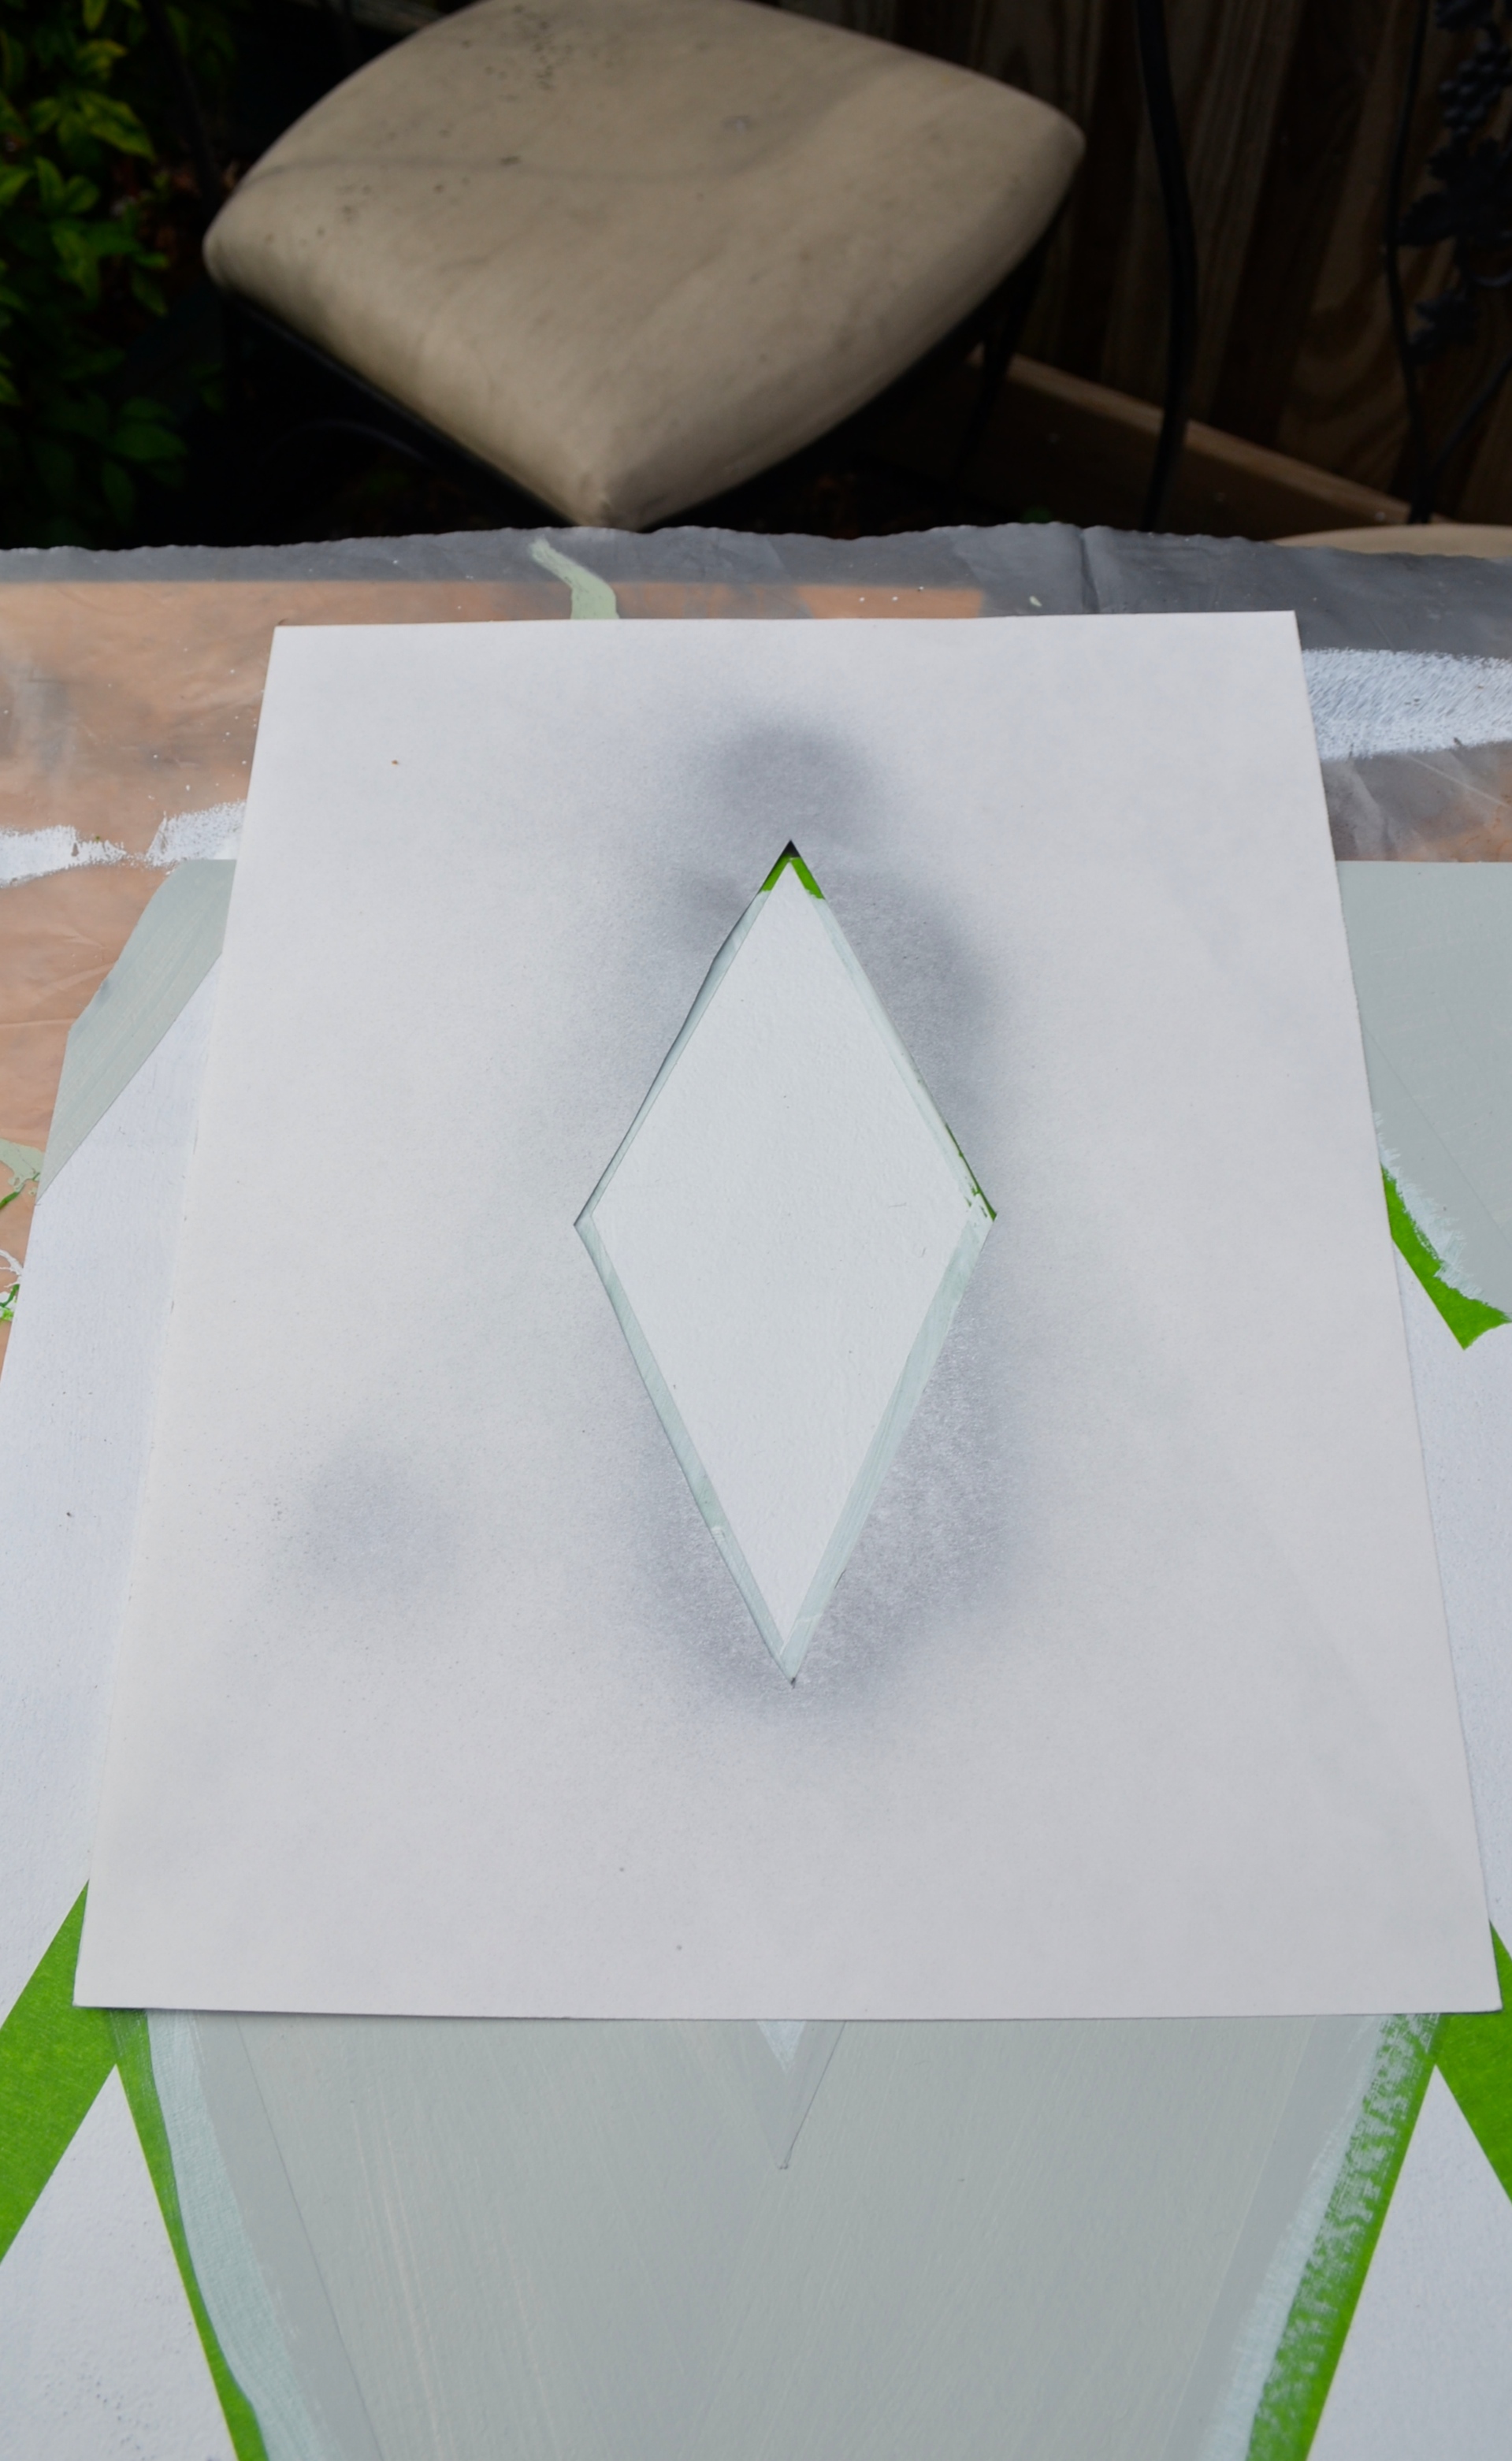
Once that was dry, I painted one coat of blue and took it back outside. I used spray paint for the silver, so in addition to taping I made a quick stencil which helped a bit with overspray.

DSC_0946

While that dried I did one more coat of the blue and then pulled off the tape where the yellow would go. I ended up freehanding the yellow. By the time I had done a coat of white and two coats of blue, there was enough of an edge that it made the cutting in much easier.

DSC_0951
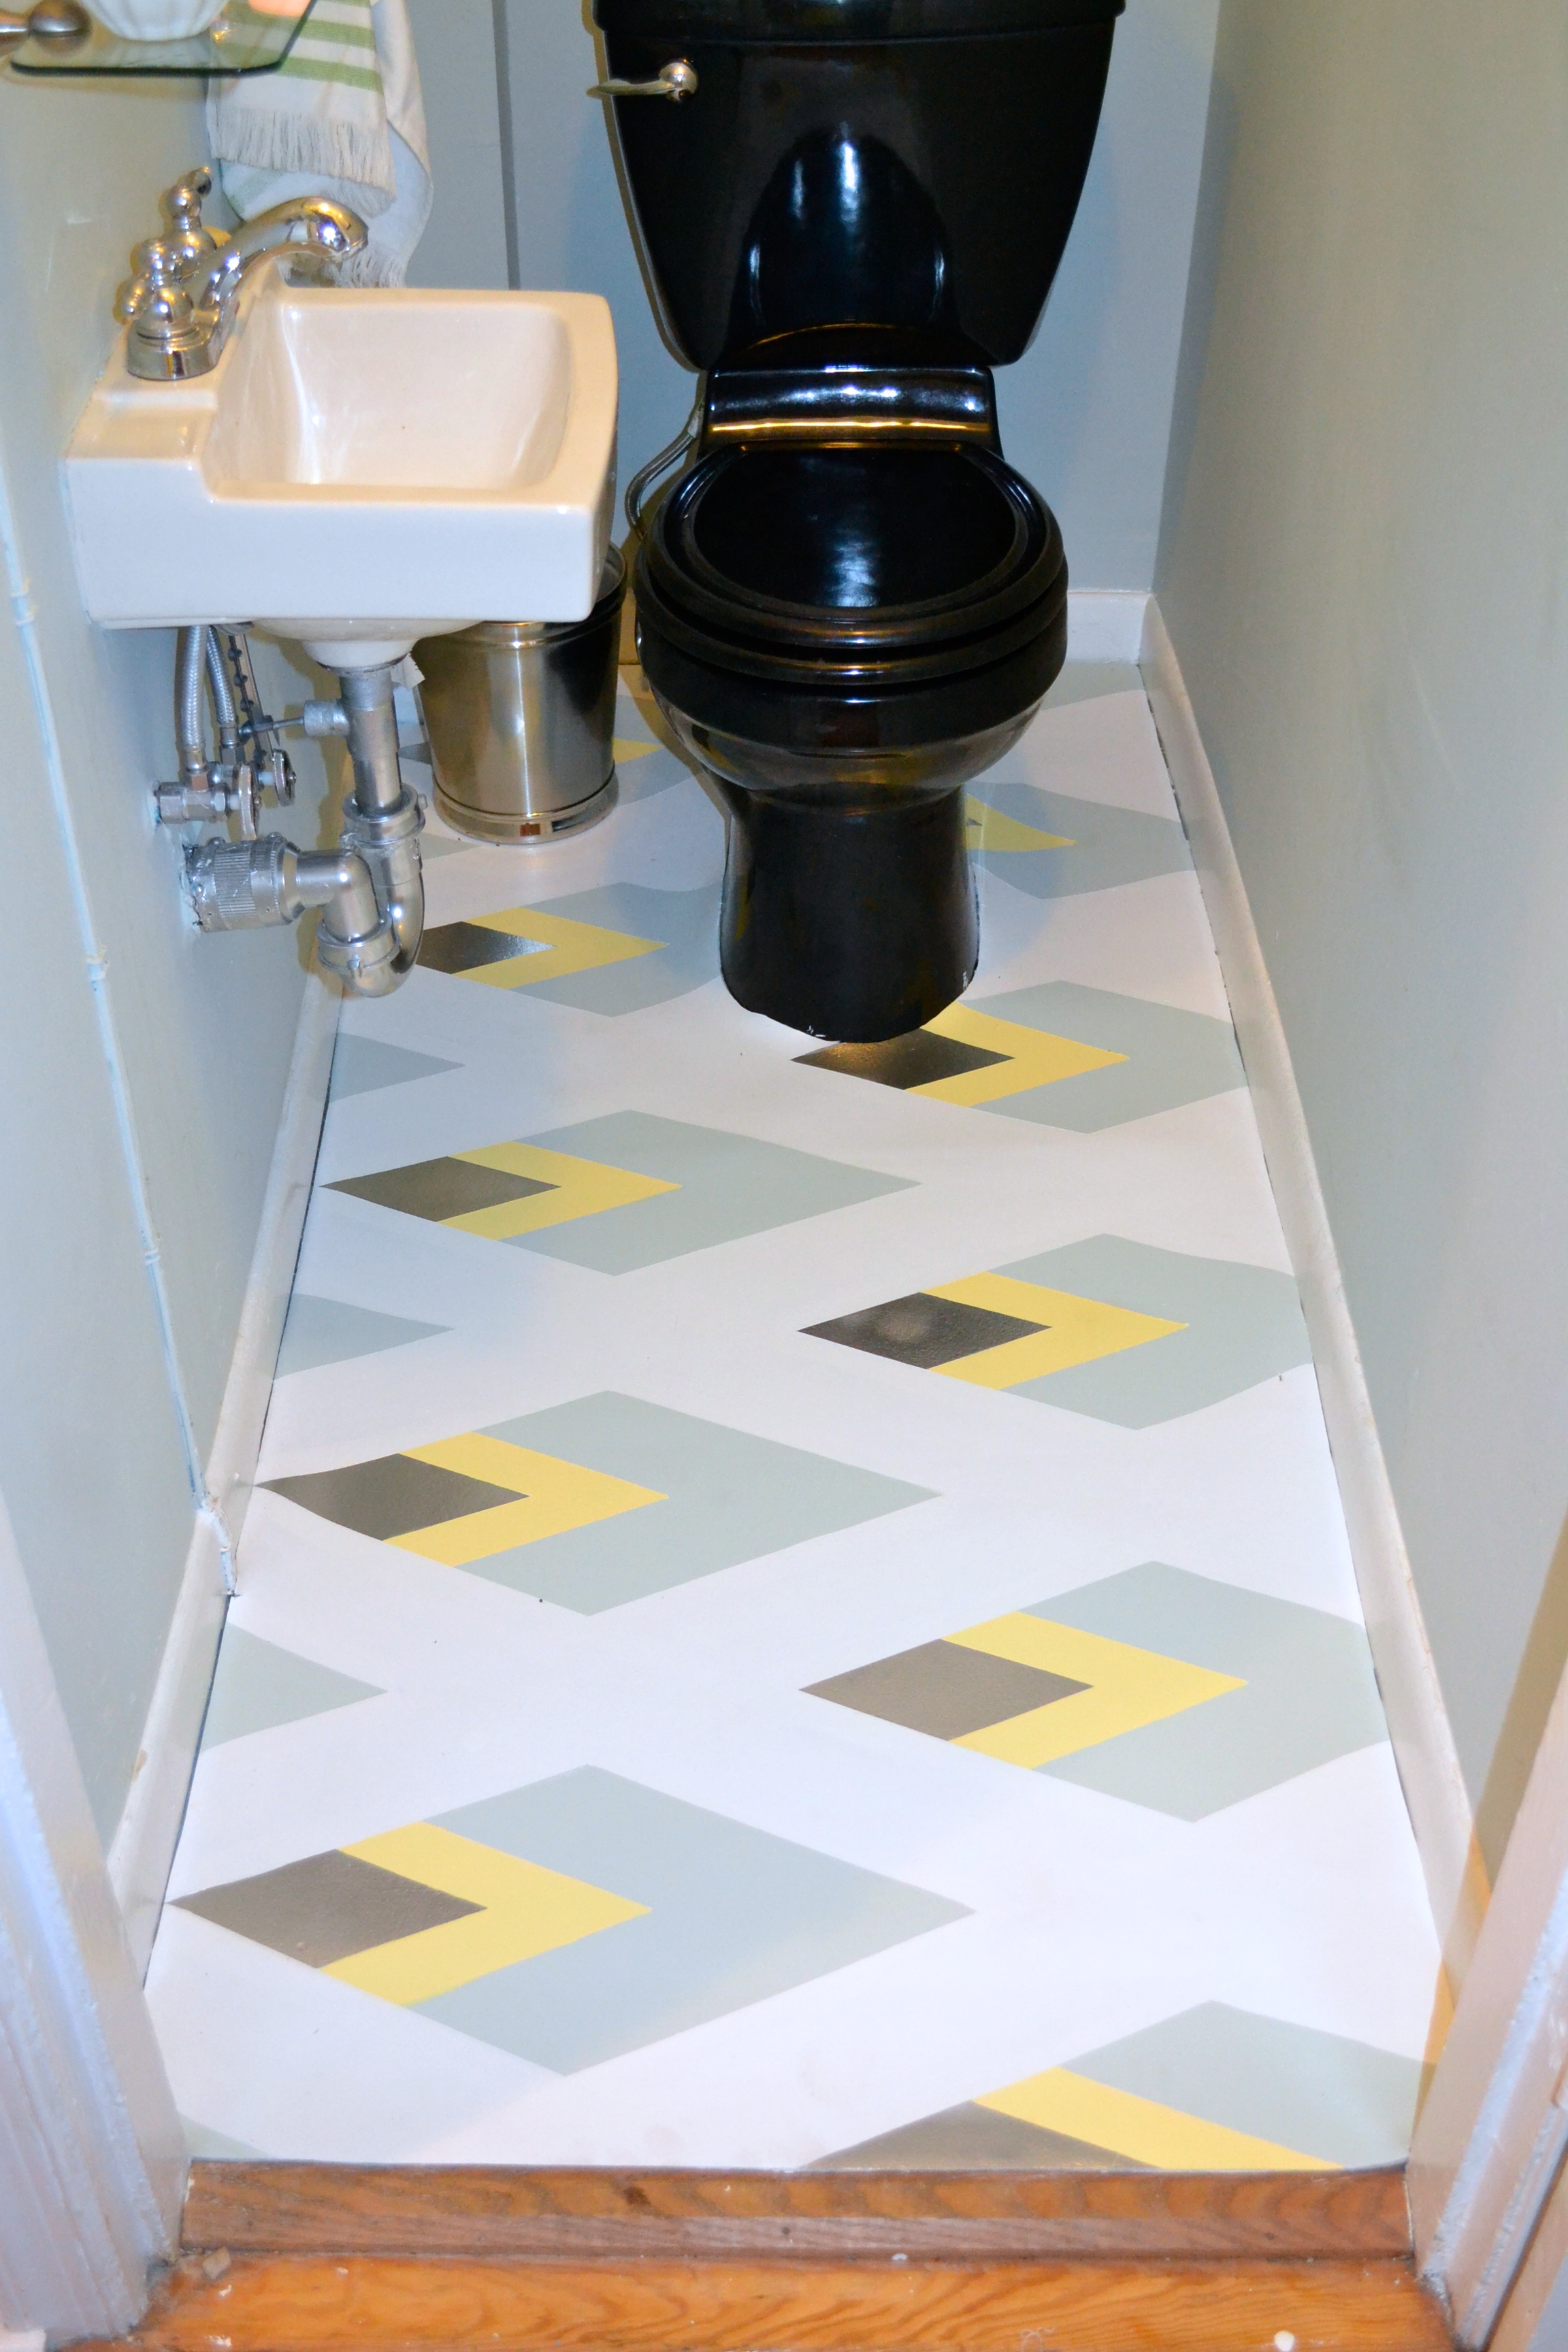
As I expected, when I pulled off the tape, the white was looking pretty dingy – there was a lot of erasing, leaning, handprints and some silver overspray. I went back over the white with one more coat and let it dry, and brought it back into the bathroom. Here she is!

DSC_0956


DSC_0982

DSC_0977And a quick before and after

Painted Diamond Floor by Just Something I Whipped Up

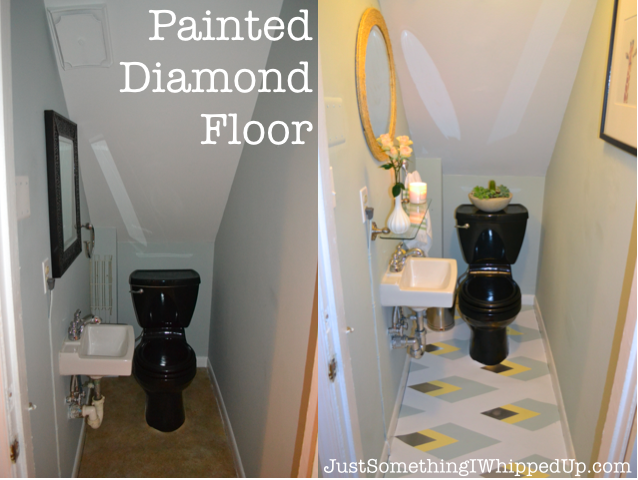
Things are looking up in there!

XO, Julia

Screen Shot 2014-09-29 at 5.31.04 PM

Light at the End of the Elfa

Hi! I am following up on Monday’s post with more on our new shelves. I am a bit obsessed with them. I had fallen into a trap in with those Elfa shelves and not even realized it. When we moved in, we immediately unpacked all of our “shelf stuff” onto the two sets of shelves and there it alllll sat. All the way up to the ceiling on both sides of the dark fireplace. WHY SO MUCH STUFF??

LR Before  DSC_0708

DSC_0712

When we took them down to paint the walls, we realized what could be if we just didn’t put them up.  It dawned on me that we could use the matching shelving units on both sides of the fireplace. They are two types of the Ikea Vittsjo – we actually got this one, the single tower, last fall to use as a bar, and ran to get this one, the double tower, Sunday morning. They are tall enough, and airy aaand black. So what’s a girl to do? Break out the spray paint!

Supplies

I used a few light coats of my current favorite gold spray paint (of those that I have used) which gave the shelves a beautiful warm gold finish. Here is the one we had already with one coat. I decided to paint them after putting them together. I could have saved a little paint, maybe a can, by spraying all of the pieces before putting them together but that would give me infinitely more opportunities to scratch or smudge the finish. I would definitely recommend going this route. This particular paint dried extremely quickly, which is something I love about it.

IMG_20140809_120310

Once the walls and the spackle filling the Elfa hardware holes was dry, we moved the shelves inside. And I all but died of happiness.

DSC_0757

I got to work putting everything back together. The things on the bar shelves didn’t change much, but I did move the glassware to a higher shelf and moved the cocktail mixing stuff lower to lighten the top a bit. You can also see that at some point in the paint fume fueled frenzy that was last weekend, the console table that the tv sits on got a couple quick coats of green paint. No more red!

DSC_0766 DSC_0834

The other side needed WAY more editing and fussing. I started by putting all of the books in the bookshelves behind the couch. Yes, that couch table is really just an empty Ikea Expedit. Now, not so empty.

DSC_0769

After a few tv shows worth of fussing, this is where I ended up. There will definitely be more tweaking, but it is about a million times better. It includes a few of my prized possessions, like the wave radio that I got in 1999.

 DSC_0821

And finally, the whole thing.

DSC_0843

Screen Shot 2014-09-22 at 4.57.17 PM

XO,

Julia

Three Quick Living Room Updates

Hi! I have been a little scattered and working on a few things at once and so most of those things are not done done, just almost done. So, I am going to share the three little things I have updated in the living room in my continuing quest to brighten it up.

The very first thing I did was take a picture to determine exactly which dark things were bugging me. I think it tends to be easier to tell in a picture, but I am not sure why. This is what I was working with. The other side of the room is a bit better, but today I am focusing on the side that needs most help. Incidentally, it is basically impossible to take a good picture of this room.

DSC_0743

A few things really jump out. First, there is just way too much stuff, but that’s not a problem I want to work on until the other shelves in the study are done. Second, the brown blinds practically punch me in the face, and the dark fan makes the ceiling, which is not low, feel like it is resting on my head. Also, the fireplace just looks so, so messy. Those are things I could fix. I found that clock broken, requiring an outlet, and looking super dingy at Miss Pixie’s and fixed it up, and my mom made the driftwood sculpture in college and then my dad and I turned it into a lamp last year, so even though they are dark, they are definitely staying.

My plan was to paint the fan blades white. At some point I would love to have a room where the sort of British Colonial woven ceiling fans work, but that is not this room at this point. Did you know that most ceiling fans blades have ANOTHER COLOR ON THE BACK?? Stop laughing, adult family members of mine, not all of us knew this. I was all ready to paint, but when I climbed up the ladder to get the blades down, I was greeted with the delightful surprise of MUCH lighter veneer on the other side of the blades. Yahoo!

DSC_0717

Changing them is really simple.  The little wing-nut-esque guy is really a sort of switch that slides the bent pieces of metal out of the way and allows you to lift the fan off of the two rivets. In the end, it took about 3 minutes to flip them over and be done. Ignore the exposed cords. I keep trying to tape them up “for now” and they fall down, so I gave up. There was a light fixture there when we moved in that was the first thing to go when we moved in and then someone who will remain nameless has not quite finished the job. But the wires are better than the light fixture, so there’s that.

DSC_0743 - Version 2 DSC_0713 - Version 2

I think having the light wood there will be good in the end. I don’t want to go too far accidentally paint myself into a white box in there.

Moving on to those blinds. I just took the whole thing off. It was remarkably simple and only required a screwdriver. We are going to need a curtain there at some point but that one change made the biggest difference of all.

DSC_0713 DSC_0719 - Version 2

The last bit is going to sound a little counterintuitive, but it was a great step. I painted the firebox matte black. DO NOT USE REGULAR PAINT FOR THIS. I ordered Rutland 1200° Brush-on Flat Stove Paint from Amazon because it was the only one I could find that specifically mentioned being ok to use IN the fireplace. Rustoleum has a high-heat paint that I have seen around a lot, but the guy at Frager’s said not to use it and since we actually use the fireplace a lot in the winter, I went with his advice.

The application isn’t hard, just EXTREMELY fumey. I vacuumed out the fireplace and then brushed it on straight from the can. And almost passed out. When they say well-ventilated, they MEAN well-ventilated. If I owned a respirator, this would have been the time to use it. But, it made a huge difference and all it cost me was paint and a few brain cells. It just looks so much neater.

DSC_0708 DSC_0708

There is obviously plenty left to do in there – a larger piece of art over the mantlepiece, paint the red console table another color, get curtains – the list goes on. But I think chipping away at some of the smaller stuff in the meantime is making a difference and I am really excited. So, a not-so-memorable before and after.

DSC_0743 DSC_0713

XO,

Julia

Coffee Table Makeover

Hi! We were in Ithaca visiting Sam’s parents this weekend and I found some pretty awesome stuff – in particular a pair of mid century side tables. Stay tuned for a post on those at some point, once I get around to fixing them up.

Once we got back, I decided it was high time to lighten up our living room. It is a room full of stuff I love, but somehow it was just off and I realized the other day that it is because there is so much red, black and dark brown, which are just not colors I love. My first fix was to pull out the red rug under the table.  I got it for our bedroom in our old apartment and it didn’t work, but I held onto it and it landed in our living room. After a while I got a big sisal rug to go under it and went with a cool layered look, but instead it came off as dark and busy. So, I finally took it out and things were immediately better (phone pics, sorry):

Coffee Table Makeover by Just Something I Whipped Up Coffee Table Makeover by Just Something I Whipped Up

Aaaahhhh, much better. But then it threw the other two glaring problems into focus. 1. The soot above the fireplace from when I almost burned our house down after owning it for 4 hours. Not exaggerating. No matter how small and burned down your first fire starter log is, DO NOT ADD A SECOND. Ugh. 2. The coffee table. To be fair, some neighbors from our old apartment left it out on the curb and we snagged it, but then left it in the not-enclosed garage there for a year so it is actually in pretty good shape, considering. Shabby chic looks great in some rooms, as does “well loved” furniture, but I don’t love the shabby chic style for my own house and it was really more well-neglected than well-loved. So at long last, I decided to paint it.

Coffee Table Makeover by Just Something I Whipped Up Coffee Table Makeover by Just Something I Whipped Up

Supplies:

  • Coffee table
  • Random orbital sander
  • Sandpaper  – 100 and 150
  • Mask
  • Cloth
  • Primer – I used Zinsser Bulls Eye 1-2-3
  • Painters Tape
  • Brush – my new fave is the Wooster 2 in. Shortcut Angled Brush
  • Paint tray
  • Paint – I used BM Ultra White and Pelican Grey, both in Semi-gloss
  • Floetrol

We brought the table outside and then I sanded. And sanded and sanded and sanded. The random orbital sander worked wonders on all of the chippy black paint on the flat parts. The rest was hand sanding which was hot and dusty and long. In the end, I had a black sawdust bathing suit “tan.” It was gross.

Coffee Table Makeover by Just Something I Whipped Up

Then I wiped everything down and put on a coat of primer. I started with the roller but it wasn’t all that much more helpful so I bagged it and went with a brush from there on out. It wasn’t a perfect coat, I really just wanted to cover everything. I love my new little brush. It is great for cutting in and has a comfy rubber handle. I did one coat on the base and two on the top.

Coffee Table Makeover by Just Something I Whipped Up

While that dried, I went to fetch the paint. Weirdly, Frager’s was HOPPING at 3:30 on a Tuesday. Finally, everything was mixed and I went home. I decided to mix in some Floetrol, which is supposed to reduce brush marks. I didn’t measure it out, just sort of eyeballed a little bit based on the instructions on the bottle and mixed well. I taped off the middle rectangle and the legs and then painted the middle, the sides and the drawer gray, and the edges of the top and the legs white. I put two coats of grey on the sides and four on top – I will probably go back and add a topcoat soon.

Coffee Table Makeover by Just Something I Whipped Up

And some before and afters. I also went after the soot with some soapy water and  a scrub brush and it went a long way.

Coffee Table Makeover by Just Something I Whipped Up Coffee Table Makeover by Just Something I Whipped Up

Coffee Table Makeover by Just Something I Whipped Up Coffee Table Makeover by Just Something I Whipped Up

There is still a ways to go in our living room, but things are slowly brightening up. There is just a ton of STUFF in there, which does not help, but once the study bookshelves are done I can redistribute and that should help too.

Screen Shot 2014-09-22 at 4.57.43 PM

XO,

Julia

DIY Campaign Desk

Hello! I am back from Haven and learned SO much and met so many amazing bloggers.  At first I kept thinking about how my three blog posts only juuuuust qualified me to be there, but by the end I was so energized and inspired that I was feeling pretty good about what I have so far.

DIY Campaign Desk by Just Something I Whipped Up

So luckily, I have been working on our study, where I plan to do all of my bloggy things. The first thing I did was find a good desk. I wanted a cool midcentury one, but all of the ones I found on Craigslist that I liked were a little too expensive, so I switched tacks. While looking, I found a white World Market Josephine desk for $50 and I remembered the campaign-style desk from Caitlin at Desert Domicile and decided to do a little makeover of my own. Here is my inspiration – a vintage campaign desk from Circa Who:

circawhodeskMine:

DIY Campaign Desk by Just Something I Whipped Up

DIY Campaign Desk

Supplies:

  • Plain desk
  • 20 flat corner braces – I used these  ($2.47/pack of 4)
  • One campaign pull – I used this one ($20)
  • Two finger campaign pulls – I used these ($8 each)
  • Dremel and router bit – the router bit does not come with the Dremel so you need to buy it separately
  • Goggles and a mask. Seriously, sunglasses and your shirt over your nose don’t count on this one.
  • Drill and drill bit set

First I gathered my hardware. It took me a little while – like a week or two – because I was being super picky and this project is all about the hardware. The big campaign pull I finally ordered was a little expensive, but I really think it makes the piece, so I think it was well worth it. It would have been better to use three of the same pull, but then it would have been REALLY expensive.

Once I had everything together, I held the bracket up and marked the holes. Then using a drill with a small bit, I made pilot holes and screwed on the brackets. One important note – on the corners, the placement of the brackets means that the screws will run into each other. I ended up removing the two screws in the vertical leg of the bracket below so that I could use all four screws in the bracket on the front, where missing screws would be more noticeable. I did the same on the right side of the desk as well. I went with four each on the sides and then four on each side of the front, basically creating the illusion of side drawers. I also put one on each side of the small middle drawer. You can see the placement in the top picture or further below:

DIY Campaign Desk by Just Something I Whipped Up

Once the brackets were on, things really started to come together buuuut that meant the easier part was over. The next step was to rout out the spots for the inset hardware. Full disclosure – this was my first routing project and while the Dremel absolutely did the trick, it took some time and serious concentration. To start, I traced the back of the large pull on to a piece of paper, cut it out and taped it on to the middle drawer. I also taped a shoebox to the underside to catch sawdust. Why not just put down newspaper you ask?  Honestly, the shoebox and tape were closer to me, and seemed like they might catch more sawdust before it spread out.

DIY Campaign Desk by Just Something I Whipped Up

Then I traced the shape onto the drawer with a pencil and routed out that area. This is the point where I should have put on goggles and a mask, but it wasn’t until I was sneezing and had dust (thankfully nothing worse) in my eye that I thought to do it. The routing took endless stopping and checking against the pull until it was as deep enough everywhere, while making sure not to go outside the line. It definitely skipped out on me a couple of times and left marks, but someday I will get around to patching them. I am not saying it’s beautiful behind that pull…

DIY Campaign Desk by Just Something I Whipped Up DIY Campaign Desk by Just Something I Whipped Up

Next, I marked the places to make the holes for the bolts using the same paper cut-out of the pull. Using a drill bit large enough to fit the bolts, I drilled the holes then screwed the bolts to the pull, fed it through the holes and put on the nuts.

DIY Campaign Desk by Just Something I Whipped Up DIY Campaign Desk by Just Something I Whipped Upd

The process for the side finger pulls was almost the same, but with one important difference – where the bolts for the center pull went through the routed out area, the screws connecting the side pulls to the desk do not. I carefully marked where the screws went and then routed out the space inside.

DIY Campaign Desk by Just Something I Whipped Up

Those pulls had screws that required pilot holes, so I switched back to the small drill bit, made the holes and then screwed in the pulls.

At that point I thought I was done, but then noticed that a lot of my inspiration pieces have hardware on the feet too. Since I was using 2 in. brackets, only one fit per foot but I think that was just enough.

DIY Campaign Desk by Just Something I Whipped Up

So there you have it. It was not super fast – I watched 1.5 movies while I did it, but I was figuring out a lot as I went along. I am SO pleased with how it came out. The study is slowly becoming one of my favorite room in this little house of ours, and I will be sharing a bunch of the other projects in here – including the built-in bookshelves we are working on which are now lovingly know as the F**king Bookshelves.

DIY Campaign Desk by Just Something I Whipped Up

And the obligatory before and after. Ignore the maze of cords on the wall. As crazy as it looks, it is a vast improvement over the jumble on the ground. Organizing the router and all of that other important junk could be a post in itself.

DIY Campaign Desk by Just Something I Whipped Up DIY Campaign Desk by Just Something I Whipped Up

Screen Shot 2014-09-22 at 4.57.51 PM

XO,

Julia