Copper and Sisal IKEA Lamp Hack

Hi! How many of you have a boring but fine floor lamp in your life? You know the one – a few sections twist together, shines up at the ceiling, you paid about $20 for it for a dorm room or your first apartment? I am pretty sure we all do. I have a way to really pump up the jam on it and make it something you actually WANT to keep in your life, as opposed to a useful barnacle, clinging to your living room like a passenger from your early 20s. (Insert sob – when did my early 20s become the past??) I made over this IKEA Kroby lamp for my friend Joanna’s yoga room/office with just a few supplies and only one episode of Downton (including drying time). This is another project from before I started the blog, but I SWEAR things are cooking along here, just nothing finished. Copper and Sisal IKEA Lamp Hack from Just Something I Whipped Up I had everything but the sisal rope on hand, and Joanna supplied the lamp, so it was a pretty quick and cheap project! Materials:

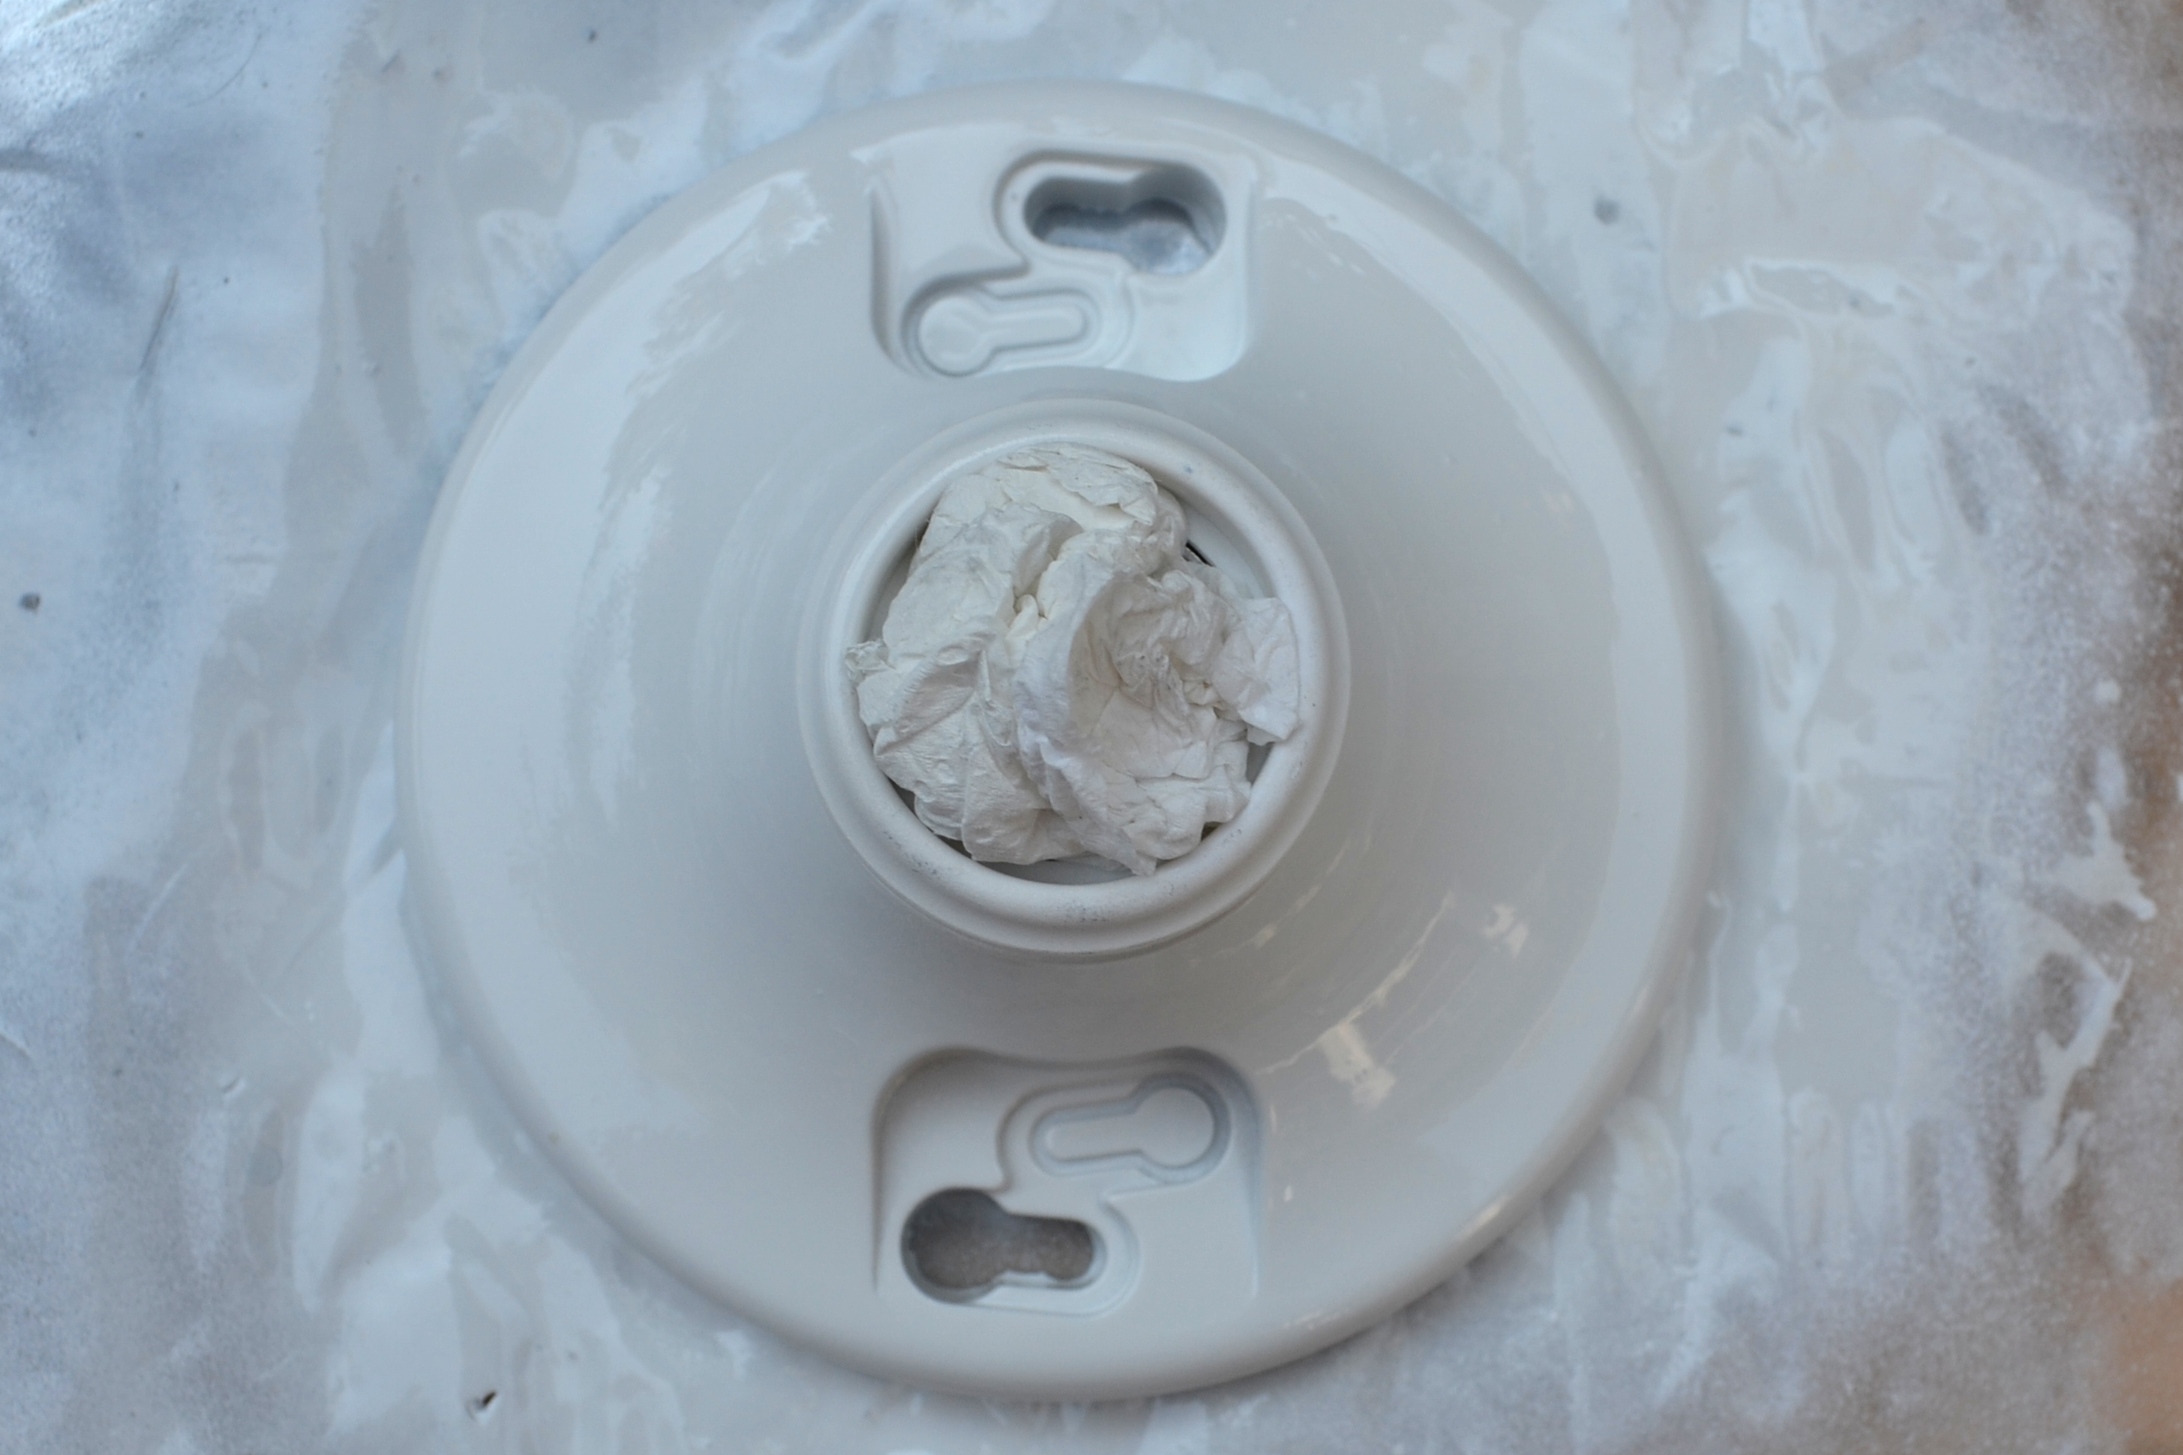
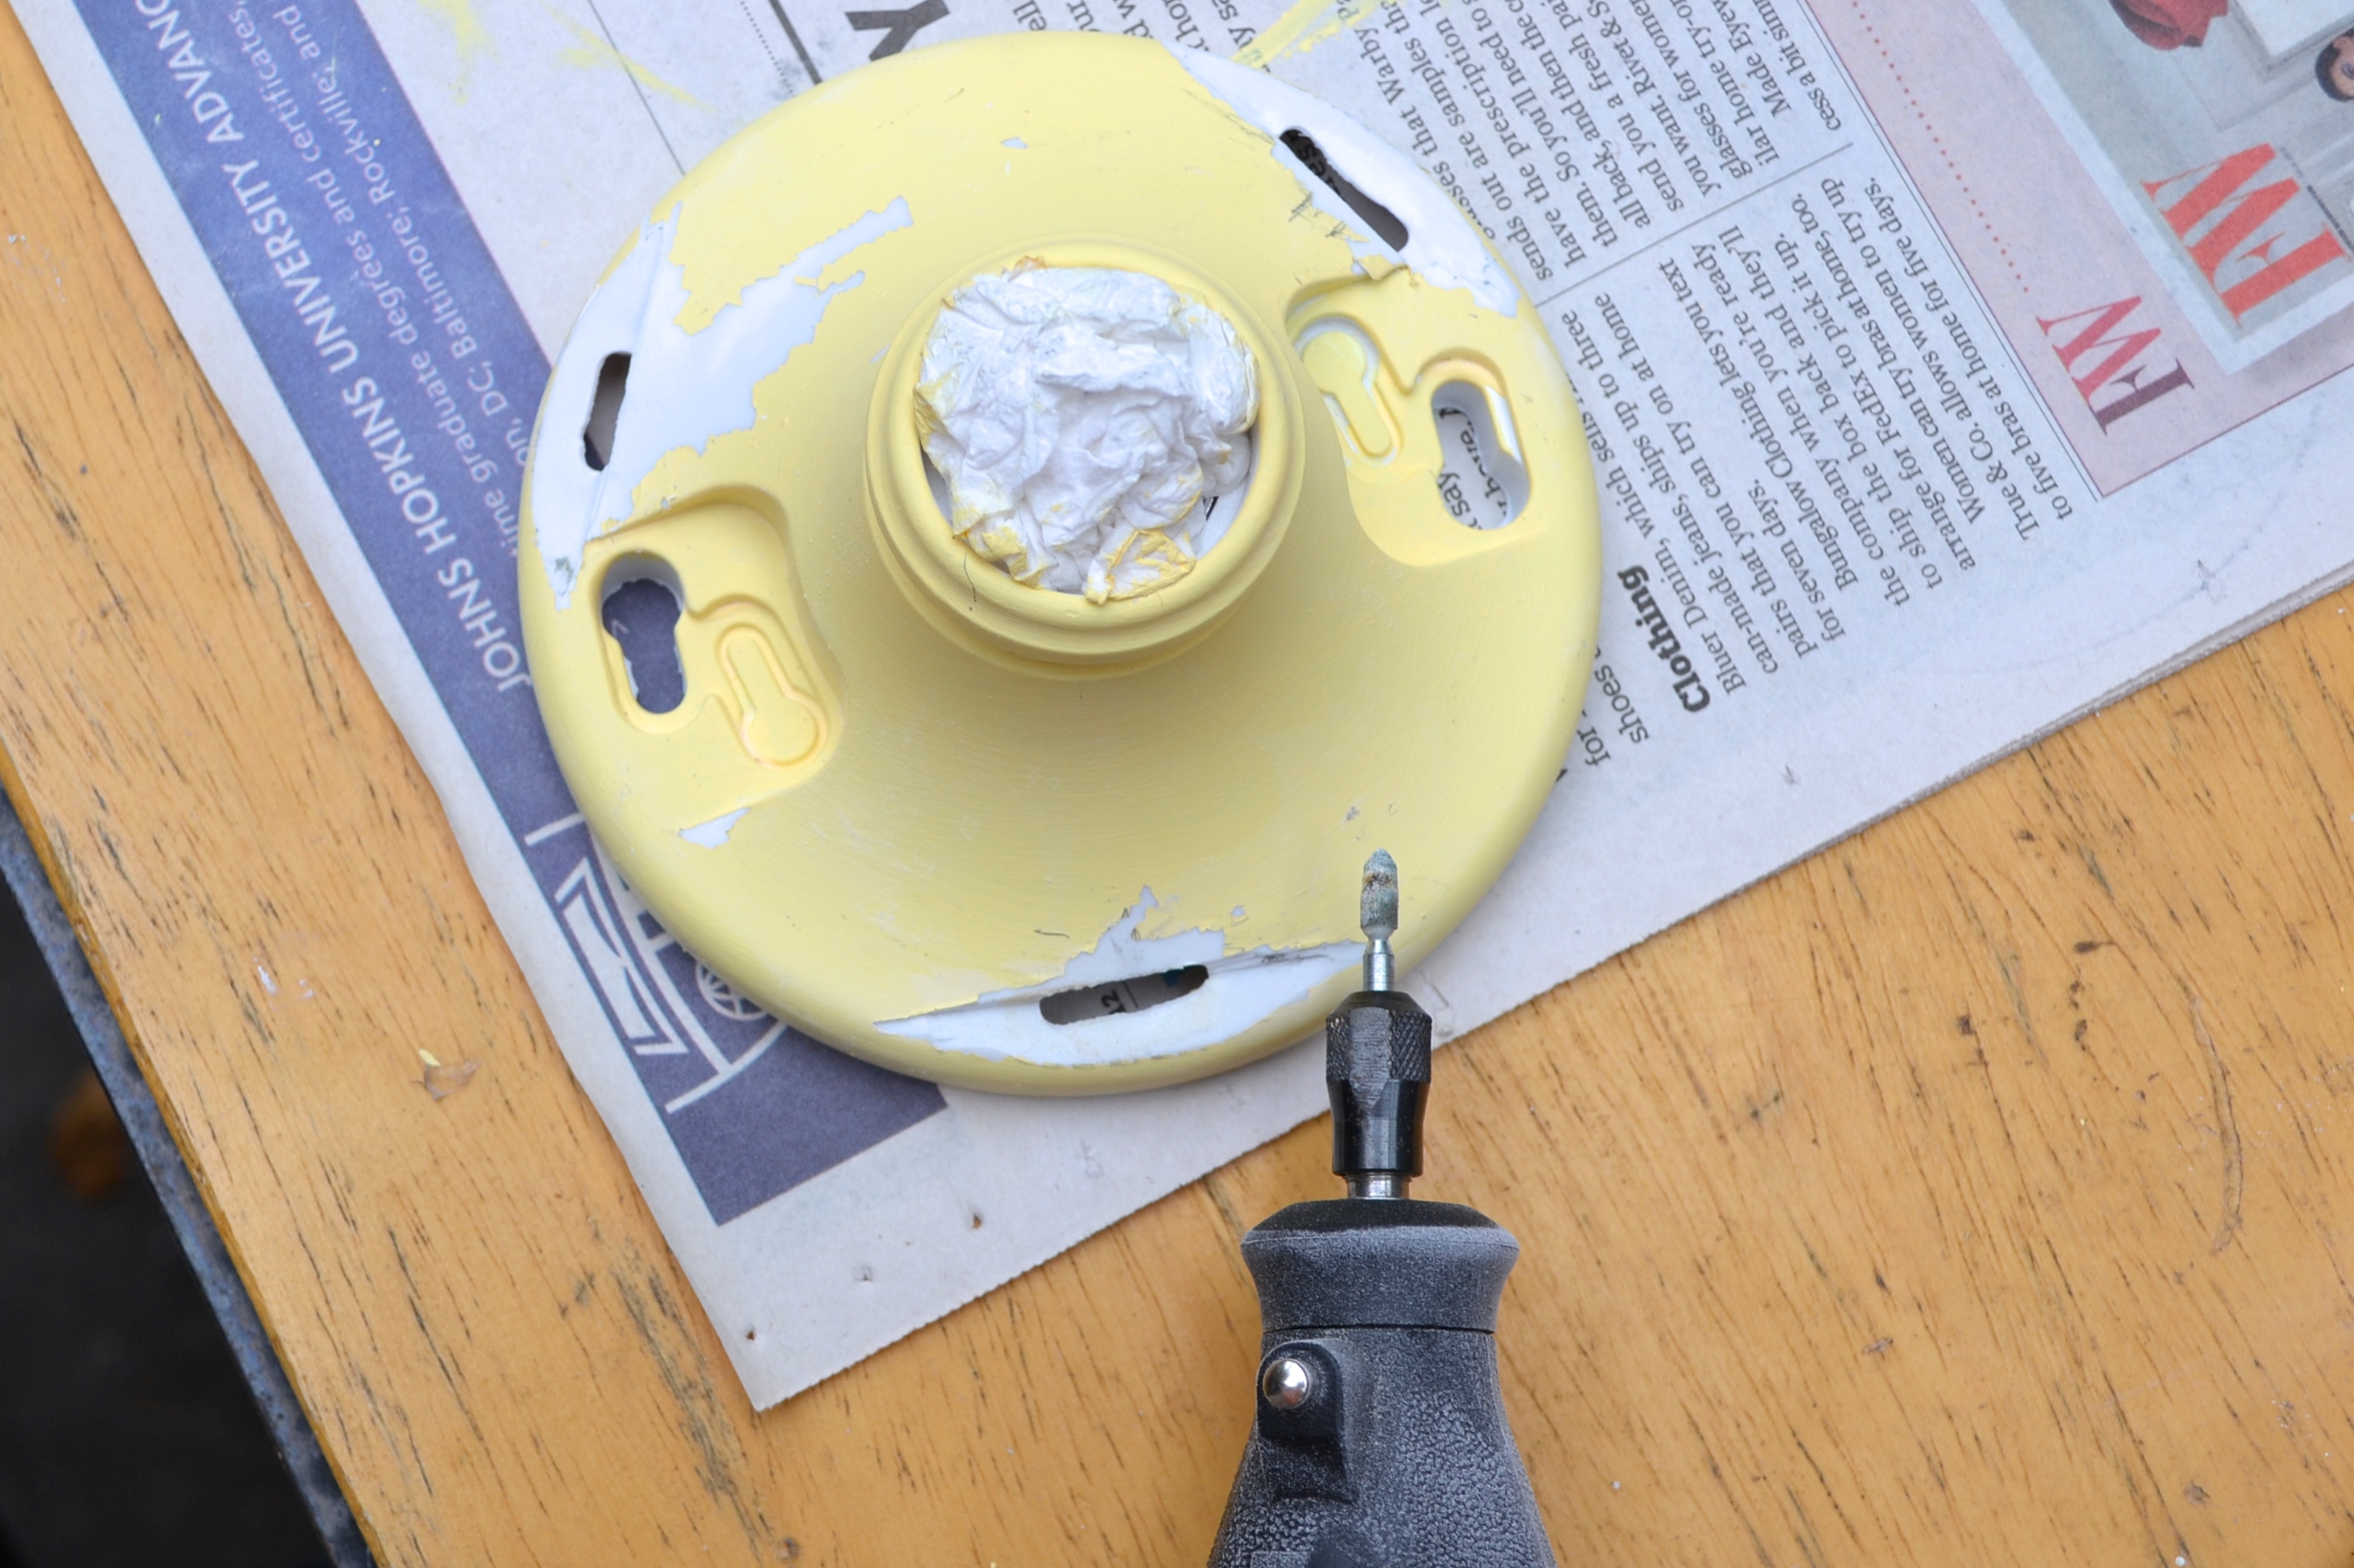
First, I removed the inner plastic ring, took the glass shade off and put both aside. I completely tape off the socket so that no paint could get in. Then I took off the base. I also took it apart to paint the metal cover and the fitting at the bottom of the stem, but in hindsight I think taping off the plastic bottom would be just fine. If you do take it apart, be careful to remember the order of the pieces. I didn’t and it was hard to get back together. These are the pieces to paint copper – I took the pictures from IKEA. Screen Shot 2015-02-03 at 2.45.59 PM I primed the cone that the lamp sits in and the base with two light coats of primer, letting dry between coats. I followed up with two lights coats of copper spray paint. The light coats prevent it from getting drippy. The cord made it really easy to hang the socket/cone part over the shower curtain rod to dry. Next comes the sisal part. The lamp post twists apart into three sections, with the cord coming out of a hole in the top third. The cord is attached to the socket, so it is easiest to wrap the bottom two sections before attaching the third. Just less cumbersome that way. Copper and Sisal IKEA Lamp Hack from Just Something I Whipped UpThe most important step here is to start by finding something interesting on tv. Wrapping the lamp post is easy and doesn’t take tooooo long, but it is boring. Once I landed on a Downton rerun, the steps were as follows – glue, wrap, twist; glue, wrap, twist; continue ad infinitum. Jk just feels that way. I tried to keep a little bit of tension on the sisal and made sure each wrap was right up against the last. Once I was almost at the end of the second section, I screwed on the top third and wrapped that as well, leaving room for the cord to come out. I wrapped it all the way to the top and cut of the rest. (I used it for my sisal wrapped mirror – $7.50 really well spent.) Copper and Sisal IKEA Lamp Hack from Just Something I Whipped UpOnce everything was dry, I screwed the whole thing back together and we were off!

Copper and Sisal Ikea Floor Lamp Hack by Just Something I Whipped Up

Copper and Sisal IKEA Lamp Hack from Just Something I Whipped Up Copper and Sisal IKEA Lamp Hack from Just Something I Whipped UpI hope this inspires you to up your floor lamp game! XO, Julia

Copper and Sisal Ikea Lamp Hack

Himmeli Candleholders

Hi! I wanted to share these fairly simple Himmeli candleholders that I made last week that might be just the thing for your Thanksgiving table. What is Himmeli, you ask? It was originally a type of little Finnish Christmas ornament, but lately it has been adapted into all kinds of cool DIYs. I had some mini fishbowls (is that what these are? Some seriously mini fish…) so I decided to spruce them up a bit with a cool “copper” Himmeli pattern.

Himmeli Candleholder from JustSomethingIWhippedUp.com

Earlier this year I made a few Himmeli plant hangers using Mandi from Vintage Revivals tutorial and they turned out looking sooo good.

Himmeli Candleholder from JustSomethingIWhippedUp.com

For the hangers I used brass and copper tubing that I cut down to size, but for this project I took a pretty serious shortcut and used cocktail straws.

Himmeli Candleholder from JustSomethingIWhippedUp.com

Materials:

  • Thin wire – you can use string/yarn but I found it was annoyingly difficult to string the straws on the yarn. Plus the wire added a bit of structure
  • Cocktail straws
  • Mini fish bowl – I think this 6″ glass bubble bowl is what I used
  • Copper spray paint

First I cut 25  2 5/8″  lengths of cocktail straw. (I went on to make a second candleholder with 2 3/4″ pieces. You can see what a difference it make in the picture above. I think the absolute best would be something between the two, but I was having trouble getting precise enough lengths.)

I then cut two “wingspans” worth of wire – about 9 feet. To start the Himmeli design, I took 5 pieces of straw and wired them together to form a pentagon at one end of the wire. Himmeli Candleholder from JustSomethingIWhippedUp.com

Thanks for your help, Mr. Brass Lobster. My other loyal sidekick, Charlie, was doing a SUPER good job of eating pieces of cocktail straw.

Next, I threaded 4 more pieces onto the wire.

Himmeli Candleholder from JustSomethingIWhippedUp.comTo make another pentagon, I threaded the wire back through the closest side of the adjacent pentagon and the connecting side of the new pentagon. That sentence s basically useless; here is a picture.

Himmeli Candleholder from JustSomethingIWhippedUp.com

Which gave me this

Himmeli Candleholder from JustSomethingIWhippedUp.comI repeated that step to get another pentagon.
Himmeli Candleholder from JustSomethingIWhippedUp.comAaaaand one more. Once I had a row of four pentagons, I added one additional piece of cocktail straw. This became the magical fifth pentagon.

Himmeli Candleholder from JustSomethingIWhippedUp.com

I pulled the wire back through the far side of the first pentagon I made, like so:

Himmeli Candleholder from JustSomethingIWhippedUp.com

And then I added two more straws and threaded the wire in at point A and out at point B which gave me this. I SWEAR this sounds way more complicated than it is.

Himmeli Candleholder from JustSomethingIWhippedUp.com

At this point I put the fishbowl into the basket I made to make sure it would fit. Phew, it did. I added a piece of straw to the wire and started connecting the points, just looping the wire forming the point as I went. Himmeli Candleholder from JustSomethingIWhippedUp.com


This is what I had once all of the points were connected. Himmeli Candleholder from JustSomethingIWhippedUp.com

I did not tie it off here though. Instead I slightly loosened the whole thing, took the bowl out and spray painted the straws copper. It sounded easier than spraying the straws in advance. Once it was dry, I put the bowl back in and tied off the last point.

OK, I am also going to tell you what I did on the second bowl because it is slightly neater, but a little more complicated and if I had pictures this post would be about a million years long. On the second bowl, I connected the first two points, then went through the next two straws before coming out at the next point over and connecting that to the next one. Like this:

Himmeli Candleholder from JustSomethingIWhippedUp.comOnce every other pair of points was connected, I went straight around the rim with the wire and filled in the gaps. And here they are!

Himmeli Candleholder from JustSomethingIWhippedUp.com

Himmeli Candleholder from JustSomethingIWhippedUp.comPop a candle in and watch the cool shadows!

Happy Thanksgiving

XO,

Julia

Himmeli Candleholder from JustSomethingIWhippedUp.com


DIY Orb Light Fixture (Part One)

Hi! Since my last post we got the absolute cutest puppy on earth, Charlie, and it hanging out with him really ate into my project time! Here he is on the day we got him. He is growing so fast!

Charlie! JustSomethingIWhippedUp

Between that and some technical difficulties with this project, it took a while, but I am ready to tell you about the light fixture I made for our little bathroom. After the sisal mirror and the painted floor, the only thing left was to update the light. Specifically this dated little blob:

Before -  JustSomethingIWhippedUp.comI think this is a little better, do you agree?

DSC_1123

Materials

  • plastic keyless lampholder 
  • Garden orb – I got mine at HomeGoods about 8 months ago, but I have seen some there recently
  • Spray primer for rusty metal
  • Spray paint (with spray paint trigger)
  • Dremel tool
  • Phone cord – not the coiled kind
  • Silver dipped bulb – I used this one 

First I primed the orb and socket with primer for rusty metal. I don’t think the existing finish was actually rust, but the the other kind is for clean metal, and this was not clean. I stuffed a paper towel inside the socket, and made sure to paint the inside of the orb completely as well.  Side note – I tried to paint it yellow on the outside and silver inside and it just didn’t work out. So ignore any yellow paint in these pictures.

Plastic Keyless Lampholder - JustSomethingIWhippedUp.com

JustSomethingIWhippedUp.comAfter the pieces dried, I lined the orb up on the lamp holder and drew lines on the lamp holder where the three metal strips touched it. I also marked the strips so I remembered which ones I was using. Important: I made sure the light bulb I was using fit through at least one of the triangles so that I could screw it in.

JustSomethingIWhippedUp.comUsing a Dremel tool with the sanding attachment, I started making flat sections for the straps to rest on. Once I had a nice flat spot, I used one of the finer grinder tips to go all the way through the plastic.

JustSomethingIWhippedUp.com

JustSomethingIWhippedUp.com

JustSomethingIWhippedUp.com

I originally considered gluing the pieces together, but while it might have worked, it seemed flimsy. I then considered wire, but we didn’t have any that looked like it would hold up – the Dremeled slits are still pretty sharp looking. Wire would probably work, but I settled on phone cord because a. we had some, and b. it was easy to pull tight and once wedged in the slots the rubber really made it stay put. I threaded the phone cord out through the hole, around the strap and back down through the hole and repeated for all three straps. The I pulled it as tight as I could, pushed it down around the screw holes and tied it off with a square knot. I shook it around a bit and those pieces are not loose at all.

JustSomethingIWhippedUp.com

I taped over the business side of the socket and I spray painted the whole shebang silver, using a bunch of light coats. I love Rustoleum’s Bright Coat Metallic Finish in Silver. Using a spray paint trigger like this one saves my fingers from some serious cramping when I have to do several coats.

JustSomethingIWhippedUp.com

Stay tuned for my next post on how I hardwired this baby and learned a lot about circuits in the process!

DIY Orb Light Fixture from JustSomethingIWhippedUp.com

There are a few other things I wanted to do to the bathroom – a coral painted trashcan and some coral details on the door, but no I think it is time to call it a day in there. A tiny space can only handle so many projects before it looks like Pinterest got ill in it and I am getting dangerously close… (Already there?) After telling you how I installed the light, I promise that will be all on this bathroom for a nice long time!

XO

Julia

Screen Shot 2014-11-20 at 2.31.01 PM


Found Stick Jewelry Organizer

Hi! It is almost the time of year to start thinking about Christmas presents, so I wanted so share an easy project that I made for my sister last year. (Madeline – I mean it was super hard and I spent ages working on it…) She has lots of cool jewelry, especially earrings, so I wanted to give her something that she could use to display them, as well as be decoration for her room at school. She likes natural, casual things, so I thought a cool stick might work well. This is what I came up with!

Found Stick Jewelry Organizer by Just Something I Whipped Up

Materials

I found the stick at Sam’s grandmother’s farm. I was on the lookout for a fairly large one that I could cut down to exactly the size I wanted. I had not been planning to use one with a fork, but once I saw it I loved it; I think it looks more sculptural.

Once I got it back to my Dad’s shop, I sawed the ends at an angle, sanded off the rough edges and painted them gold. I screwed the eye hooks in pairs on the upright section of the stick, with the idea that those could hold earrings. I screwed the half-inch hooks along the horizontal part of the stick so that necklaces could hang straight down. Finally, I added the two 1.5-inch hooks at the end to hold bracelets and bangles.

Found Stick Jewelry Organizer by Just Something I Whipped Up

(PS – how smart is she to use a curler to keep her necklace from getting tangled???) To hang the stick, I used my dad’s belt sander (you could also use sand paper or a hand sander) to flatten the back of one section at the top of the upright part of the stick, and screwed in the d-ring to hang it.
Found Stick Jewelry Organizer by Just Something I Whipped Up
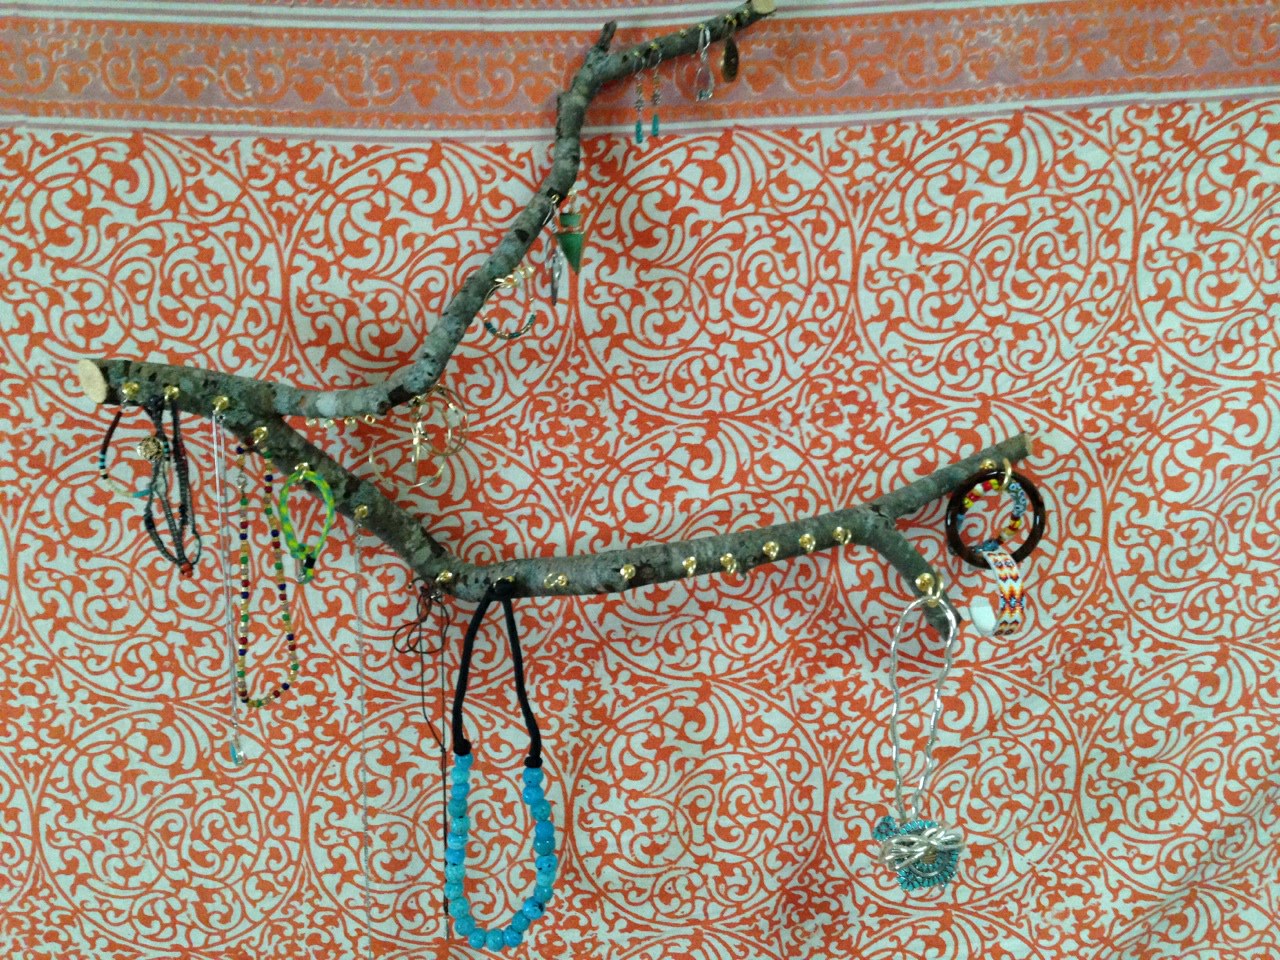
And there you go – a really cool present that anyone can make, as long as you can find yourself a stick. We had Christmas in Florida last year, so I brought a (blurry…) photo of it to give her – here it is with some of my stuff.

Found Stick Jewelry Organizer by Just Something I Whipped Up

XO,

Julia

PS Thanks to Nate for the close up pics!!

Found Stick Jewelry Organizer by Just Something I Whipped Up

Painted Linoleum Bathroom Floor

Hi! I decided it was time to turn my attention to our tiny, neglected downstairs bathroom. The invisible yet defining feature is a trap door under the floor in there that goes to the (terrifying) crawl space under the house. The reason the floor is an unattached piece of linoleum is that we have to fold it back to get to the trap door. I am sure there is a better/more attractive solution to the problem, but we are still in the work-with-what-we’ve-got phase here. The painfully visible feature is the hulking black toilet of doom. Alas, it stays for now…I am basically just pretending it doesn’t exist. This is where we started.

DSC_0629

I think my favorite thing about it is that the previous owners painted it Benjamin Moore’s Quiet Moments, which is possibly the most hilarious bathroom color name ever. Except maybe BM’s Stolen Moments. Luckily, it is a totally inoffensive light greenish, grayish blue. I would love to put some really fabulous wallpaper in there, like Brazilliance, Clarence House’s Congo or Osborne & Little’s Summer Palace. However, those are all serious investments and we plan to redo the kitchen at some point which might mean moving the bathroom wall, so Quiet Moments it is for now. The first thing to go in there was my Animal Print Shop Giraffe, which I love so much. The sink is beyond small and there is hardly room for a bar of soap, so I added a simple glass shelf (this one from Home Depot), as well as the round mirror and a rug.

DSC_0597

The latest round of updates started with the sisal mirror and a few other small projects, including painting the linoleum white. I also spray painted the pipes under the sink and while not as good as actually being all nickel pipe, it’s way better. I was just not feeling the white floor though. That’s where this post’s project comes in.

Diamond Painted Linoleum Floor

Materials:

  • Graph paper and a pencil
  • Paint – I used white, BM Quiet Moments, BM Mellow Yellow and Rustoleum Bright Coat Metallic Finish in Silver
  • Painter’s tape
  • Ruler
  • Math Skillz – or time and patience. I am not blessed with the first or last, but I muddled through
  • 1″ artists brush
  • 2.5″ angled paintbrush

The one good thing about the weird linoleum/trap-door situation is that I could pull the whole thing out and lay it out on the beer die table table extender in the backyard, which opened up a world of options. I decided to paint a pattern on the floor. I originally thought a scalloped pattern of some kind, but I wanted to start that afternoon and so a pattern using painters tape would be easiest. I looked around for inspiration and remembered Mandi’s wall pattern on Vintage Revivals from a few days earlier. I adapted it slightly and sketched it out on graph paper.

DSC_1008

Once I knew what I wanted, I figured out how to translate the pattern on the graph paper to tape on the linoleum. It. Was. Hard. And not made easier by the clouds of pot smoke wafting across our back yard thanks to our neighbors. I started by making large diamonds and then dividing them into smaller ones, using Mandi’s pattern as a reference. The important part is remembering to measure the distances from the correct side of the piece of tape. The diamond points on the sides needed to be 14″ apart, so I had to remember to include the 1″ piece of tape in the measurement. Here it is mid-taping for reference. The small diamonds will be silver, the two-piece think lines are where the yellow will go, and the diamond after that will be blue. The rest will be white.

DSC_0944Once all of the taping was done, I painted white over the edge of the tape in the spaces I was going to paint blue or silver with the idea that any paint that seeps will be white onto white, not the color onto white. It’s a little easier to tell what is going on once that step is complete. It started raining so I had to do the next bits inside.

DSC_0945Once that was dry, I painted one coat of blue and took it back outside. I used spray paint for the silver, so in addition to taping I made a quick stencil which helped a bit with overspray.

DSC_0946

While that dried I did one more coat of the blue and then pulled off the tape where the yellow would go. I ended up freehanding the yellow. By the time I had done a coat of white and two coats of blue, there was enough of an edge that it made the cutting in much easier.

DSC_0951As I expected, when I pulled off the tape, the white was looking pretty dingy – there was a lot of erasing, leaning, handprints and some silver overspray. I went back over the white with one more coat and let it dry, and brought it back into the bathroom. Here she is!

DSC_0956


DSC_0982

DSC_0977And a quick before and after

Painted Diamond Floor by Just Something I Whipped Up

Things are looking up in there!

XO, Julia

Screen Shot 2014-09-29 at 5.31.04 PM