I am back! I may have been silent, but I have been busy and I am excited to share what I have been up to. Since I last blogged I found a really cool new job, which has really cut into my project time, but I suppoooose it’s a good thing.
We have been slowly but surely working on turning our bedroom into a place we actually like, instead of a perfectly fine, but not super functional spot. Part of that process (which I will share in upcoming posts) was finding a bureau that fit in the nook to the right of the fireplace. A simple task you might think, but no. I was even willing to buy something new! (Gasp) But alas, nothing I could find fit the dimensions. I wanted to get the largest bureau that would fit, and the deck was stacked against me, until I came across this monstrosity beauty at the Eastern Market flea market. In all her orange glory. Woof.:
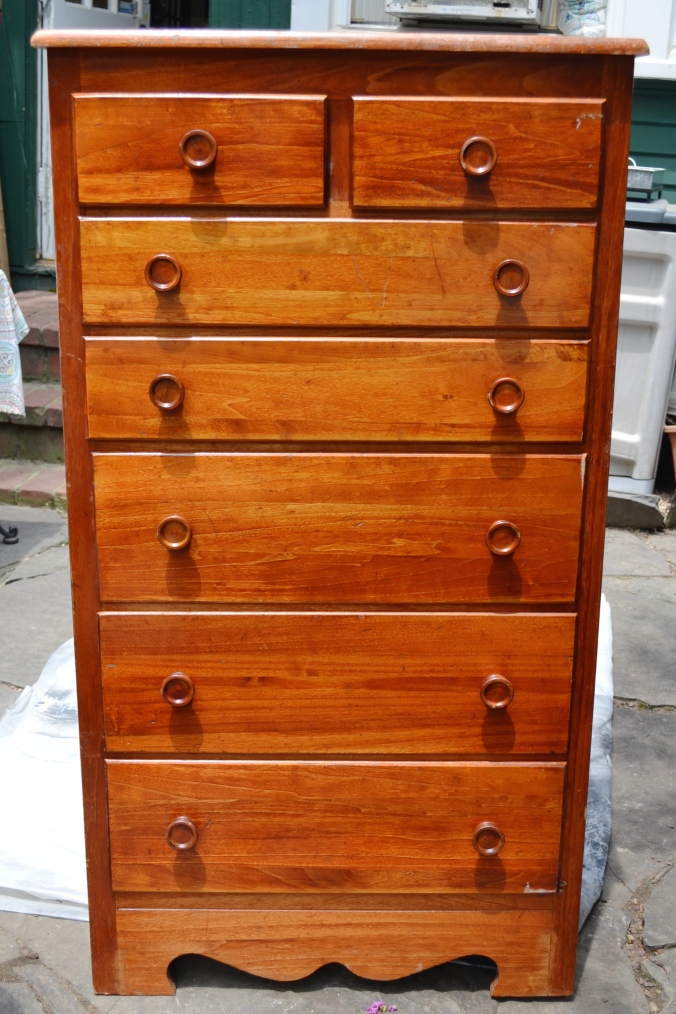
This was going to require some major surgery. I gathered my arsenal and got to work. Here is what I used.
- Random orbital sander and tons of discs
- Paint stripper
- Gloves
- Chip brushes
- Scrapers
- Empty paint can for nasty chemicals
- Mask (no really, USE IT)
- White paint/brushes
- Stain/Brushes
- Fine grit sandpaper – I like 220
- New knobs
- Jigsaw
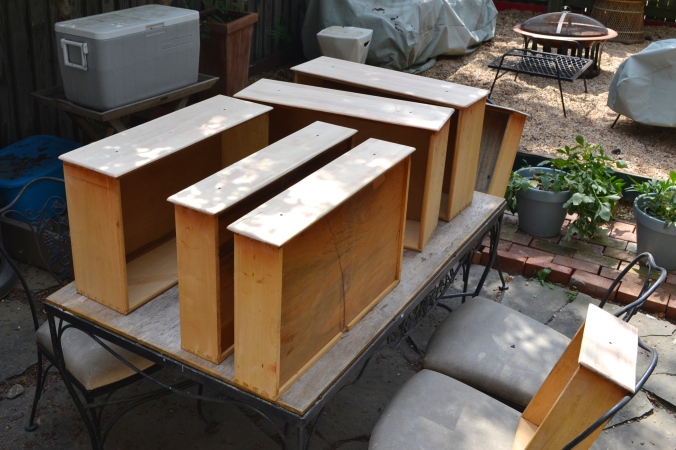
First I took out all of the drawers and removed and chucked the knobs. Then I stripped the orange finish off, following the instructions on the can. Basically glop a good layer on, let it sit BUT NOT DRY and then scrape off the gunk. I let it dry by accident because I am a dummy and it was a whooooole thing. After a couple of rounds of stripping (breezing over what was a fairly laborious process) I sanded the whole thing down. I planned to stain the drawers and top, so I made sure no hint of the orange remained on those.
Once I recovered and my nostrils stopped stinging, I used a large oval platter to trace an arc around all of the scrolly-business at the bottom. I jigsawed out the scrolly-pieces and sanded down the edges, leaving a pretty good looking bottom, if I do say so myself.


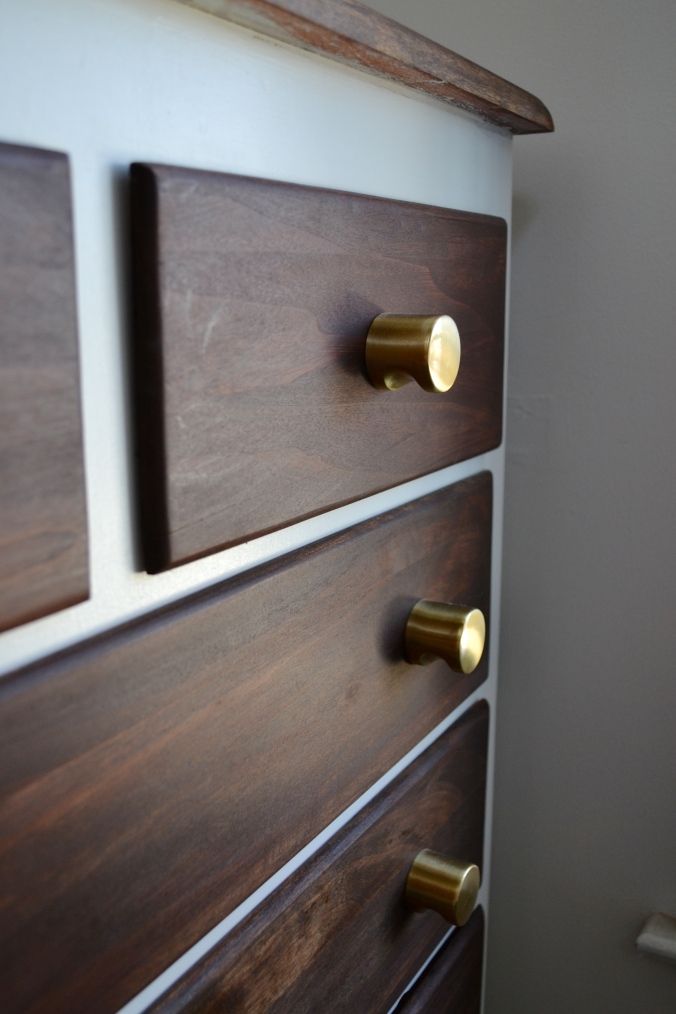
And with that, I was down to “blank slate” status. I painted the frame part with a couple of coats of regular Benjamin Moore Ultra White, sanding between coats. I stained the top and fronts of the drawers with several coats of MinWax in Special Walnut. Brush on, let sit, wipe off. Repeat. I may seal it with paste wax at some point, but it has a been a few months and so far it is holding up well.
The bureau needed 12 knobs and trying to find cool ones that didn’t break the bank was tricky. I found a few candidates at the usual sources, but the thought of putting over $100 in knobs on a $60 dresser just hurt. I finally found these at D. Lawless. They are actually my favorite and somehow they were on sale for $.50 each at the time (down from a whopping $1).
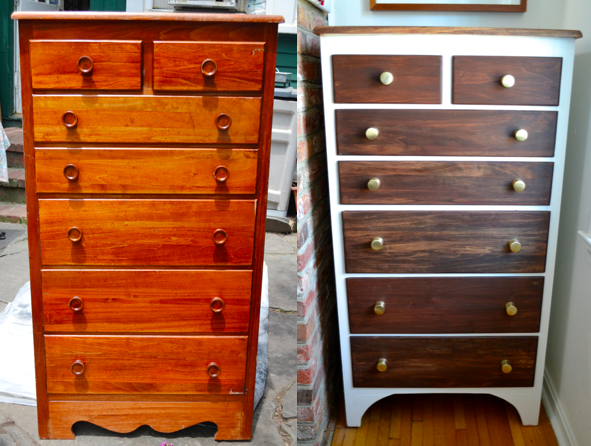
So, all put back together, here she is!
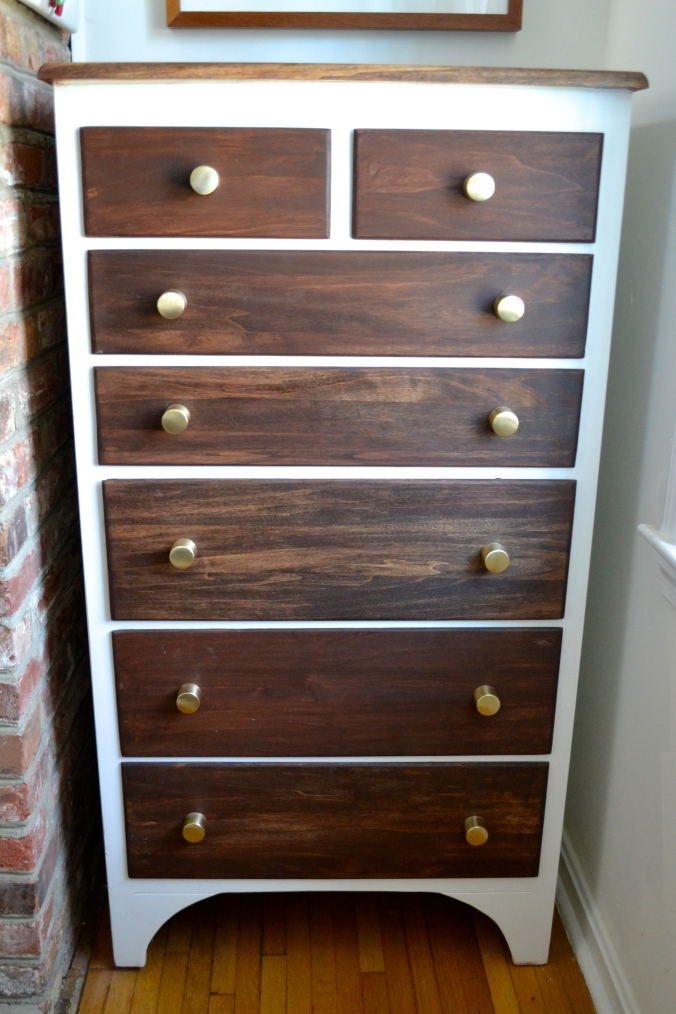 Not bad, eh? Here is a side-by-side for your viewing pleasure.
I hope you like it! I will be sharing the other bedroom progress soon.
XO, Julia

What a transformation!!
Love it!
So great to see you…
Thanks Peggy! Great to see you too
Oh my goodness! I jumped here from Hometalk to pin this. I love it. It’s super gorgeous! I want to pull something similar for our bedroom. (There is no way I manage create what you did here but even if I get it close, I will be a happy bunny).
I am so glad you like it! Thanks!
SO impressive! Looks amazing!
Thanks Robin! XO
Way to go, Julia!
Thanks Diana!
saw this on Hometalk! What a beauty.
pinning!
gail
Thanks Gail! Glad you stopped by!
So cool!!!
Love Alison
Sent from my iPhone
>
Great looking piece, beautiful! Did you remove the drawer fronts so they sit flush with the face frame or did you cut off the overhang? I love the modern look!
Hi Pam, Thanks for stopping by and I am glad you like how it turned out! I actually didn’t change the shape of the drawer fronts or overhang at all. The before is in pretty bright sun, so the shadows may be exaggerated.